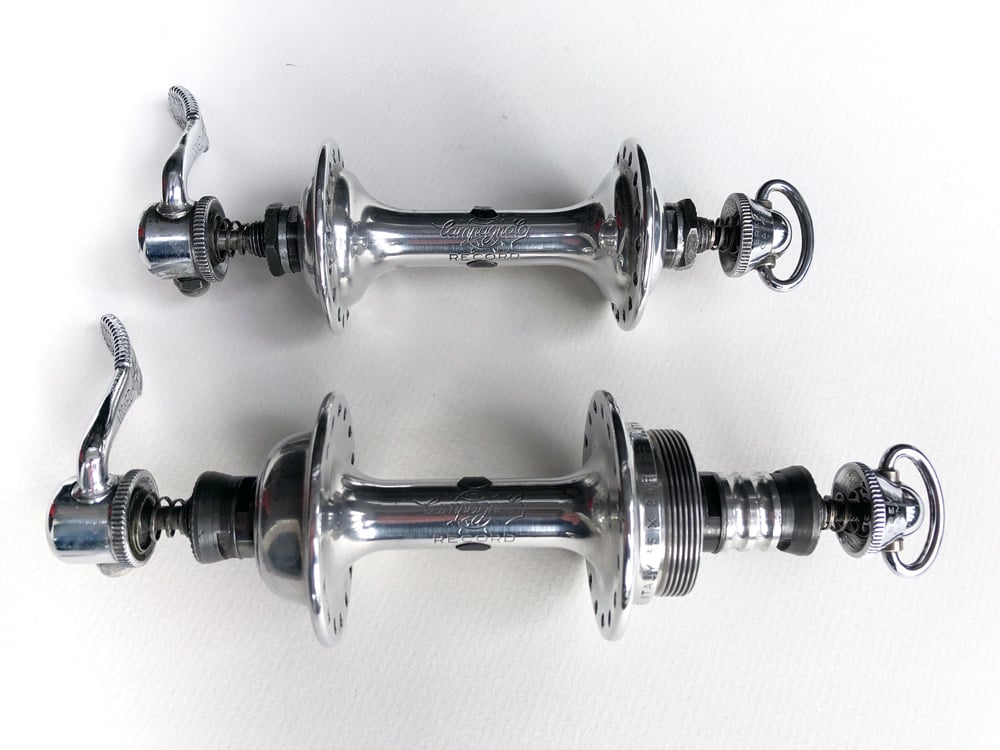
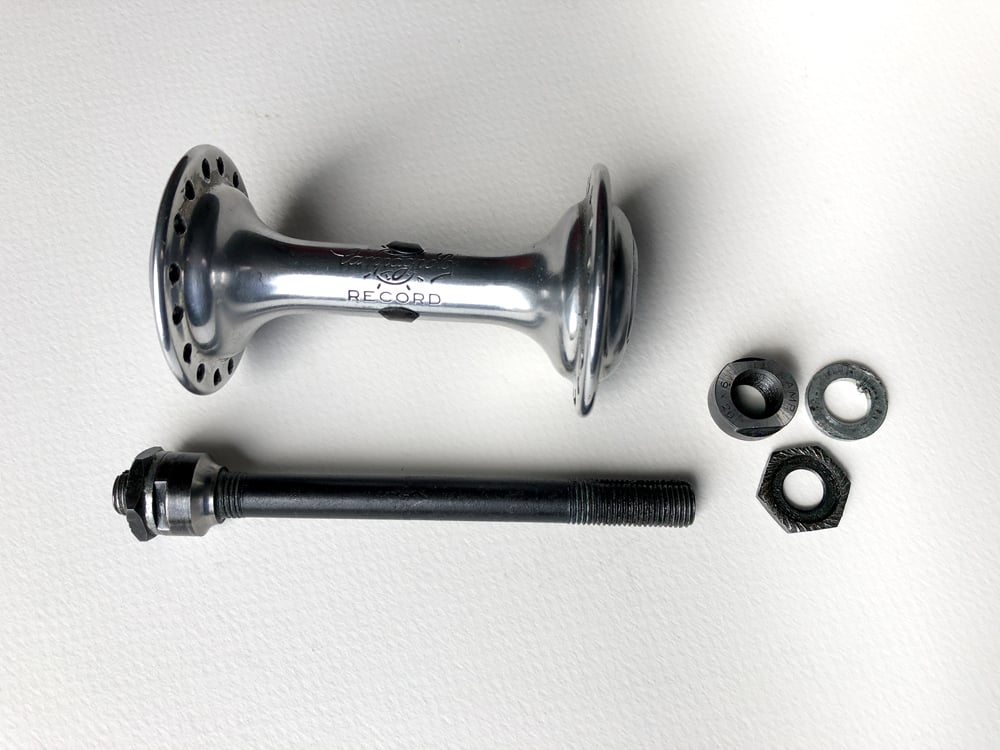
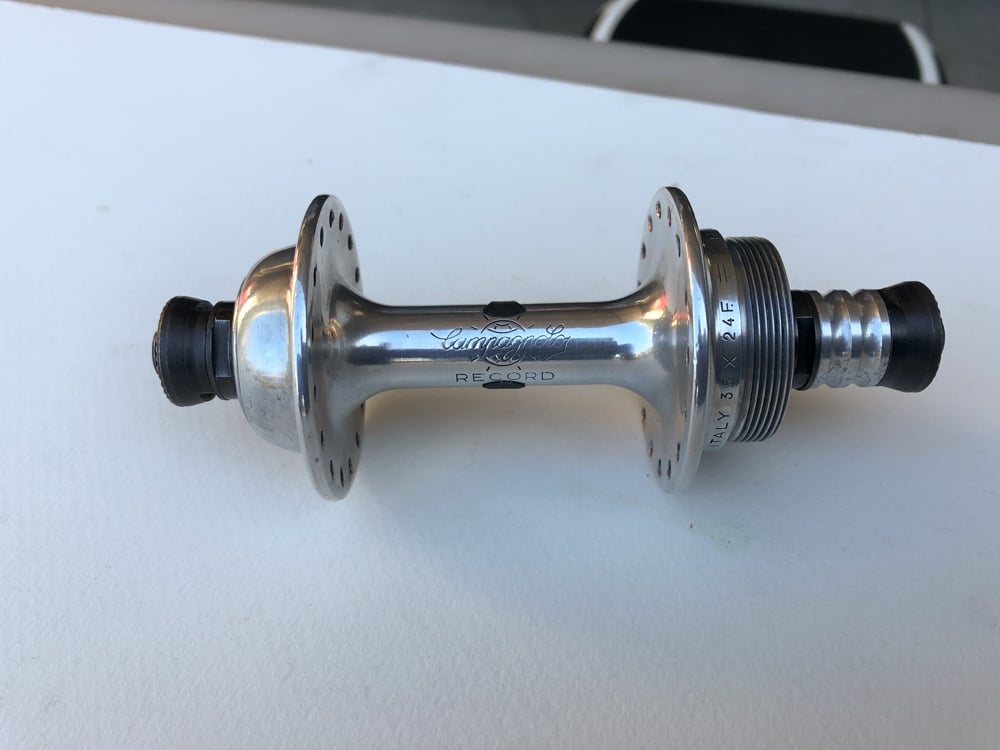
These classy Campagnolo bicycle hubs were in production from the 1970’s to the 1980’s. They were supplied in several Campagnolo group sets namely Nuovo Record, Record and Super Record. They are a typical cup and cone design which provides for high durability and precise bearing load adjustability. As long as the internal cups are in good condition, bearings and other parts can be replaced.
Why learn to service your own hubs?
Learning how to service and adjust a cup and cone bearing system is an invaluable skill when working on vintage bikes as most wheel hubs, bottom brackets and headsets are a cup and cone design. So the same techniques can be applied to service and install any of those components. Even modern Shimano and Campagnolo wheels often feature cup and cone style hubs.
The service process is the same whether the hub is in a wheel or not. Some of these steps can be performed using different techniques. The explanations featured in this article are the methods I use. Suggestions or amendments can be added to the comments section below.
Before deciding if this is a process you want to try please note that this article is purely an overview of how I service my own wheel hubs and should not be treated as professional advice. Please read my disclaimer at the end of this article.
Tools Required
To service the front hub, you will need:
- a 13mm cone wrench.
- a 16mm wrench for the lock nut.
- Bent nose pliers are useful to remove and insert ball bearings.
- A clean rag, cloth or towel
- Good quality water proof grease for bicycle bearings.
- A pair of rubber gloves.
To service the rear hub, you will also need:
- two 14mm cone wrenches.
- tools to remove the freewheel from the rear wheel.
Optional Items:
- Paper towel
- Cotton buds
- Degreaser
- A short length of coat hanger wire
Assessing the condition of the hub
Before you begin, remove the quick release skewer. Now assess the condition of the hub. Whilst holding the wheel (or hub body), use your fingers to rotate the hub axle to ascertain how it feels.
- Does the rotation feel notchy or rough?
- Does the axle rotate freely or is it tight?
- Does the axle have any play (up-and-down or in-and-out)?
- Feel the axle on both sides of the hub. Do they feel the same?
- Does the axle feel the same in both front and rear wheel hubs?
If the rotation is not smooth or there is play in the axle, the hub may only need an adjustment. Once you have disassembled the hub and removed the axle, you can decide if you need to clean out the old grease or simply re-insert the axle and adjust the bearing tension as described later on.
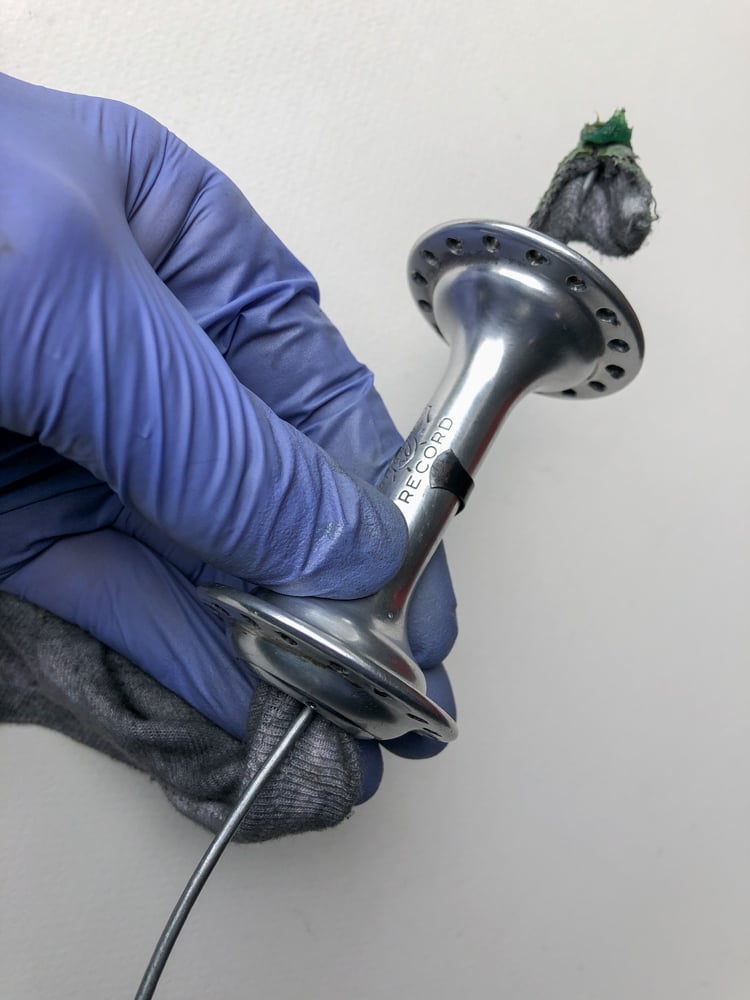
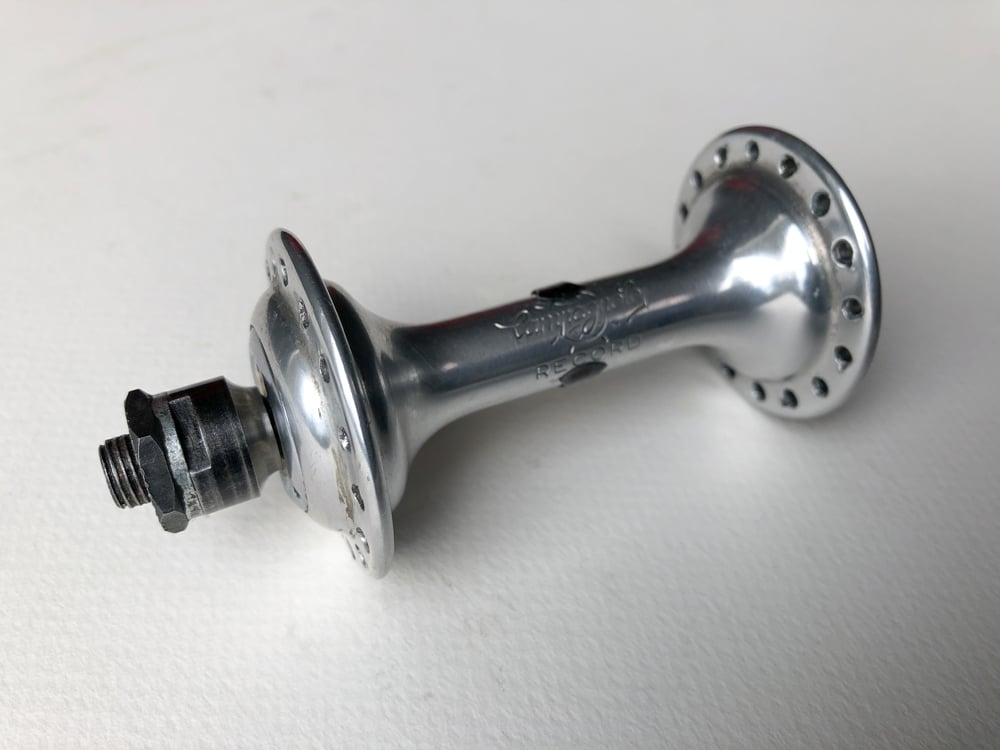
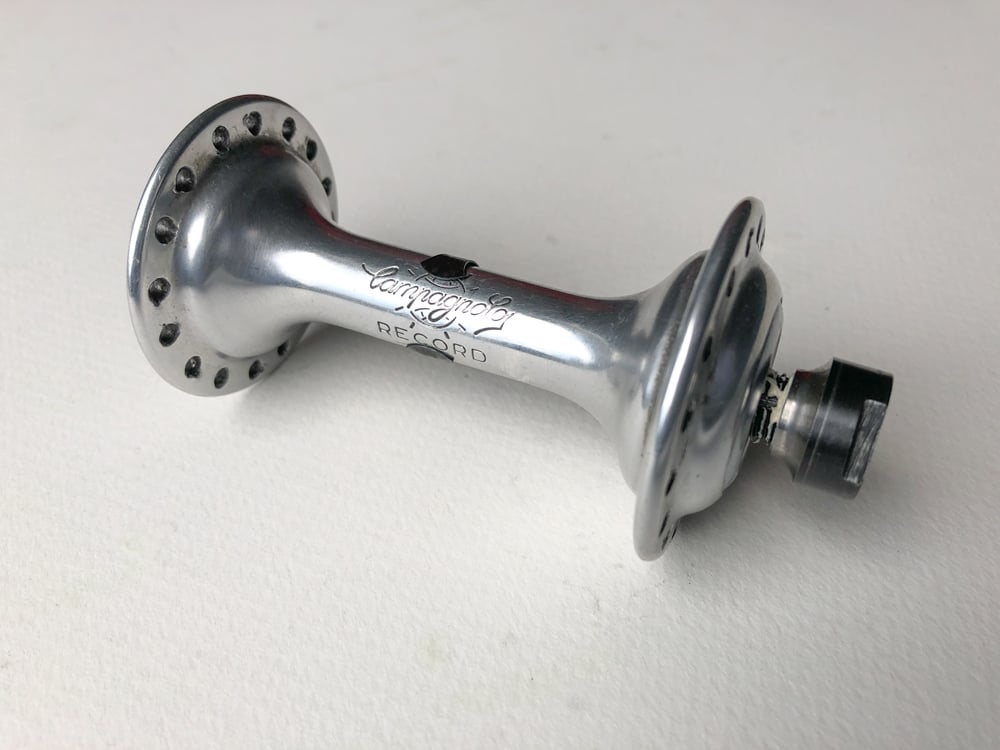
Disassemble the front hub
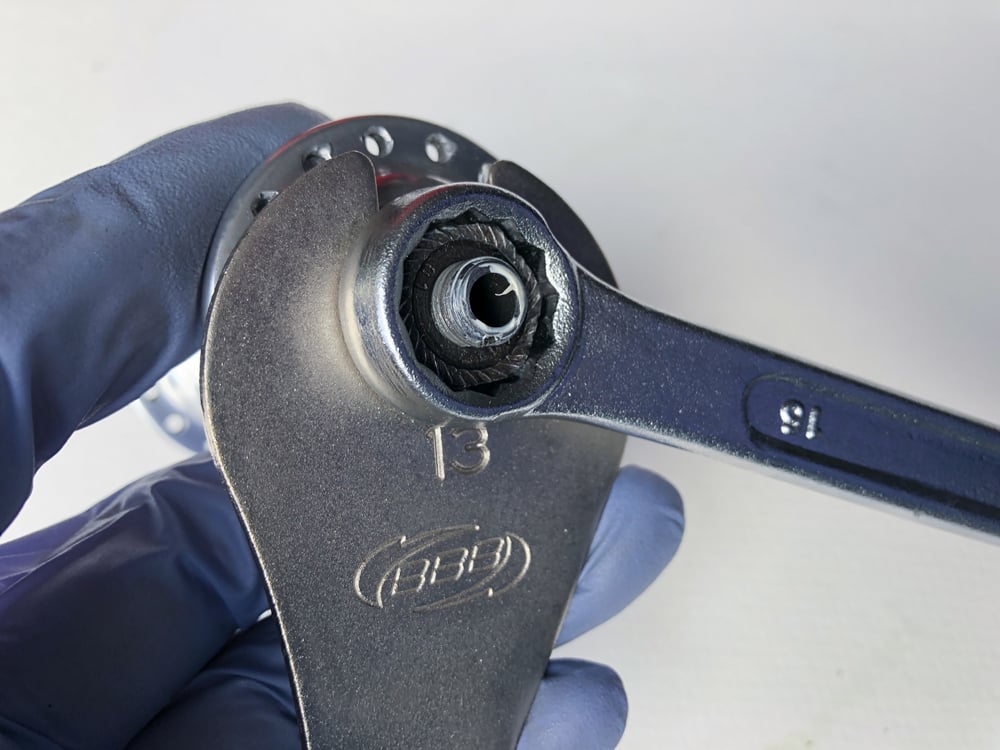
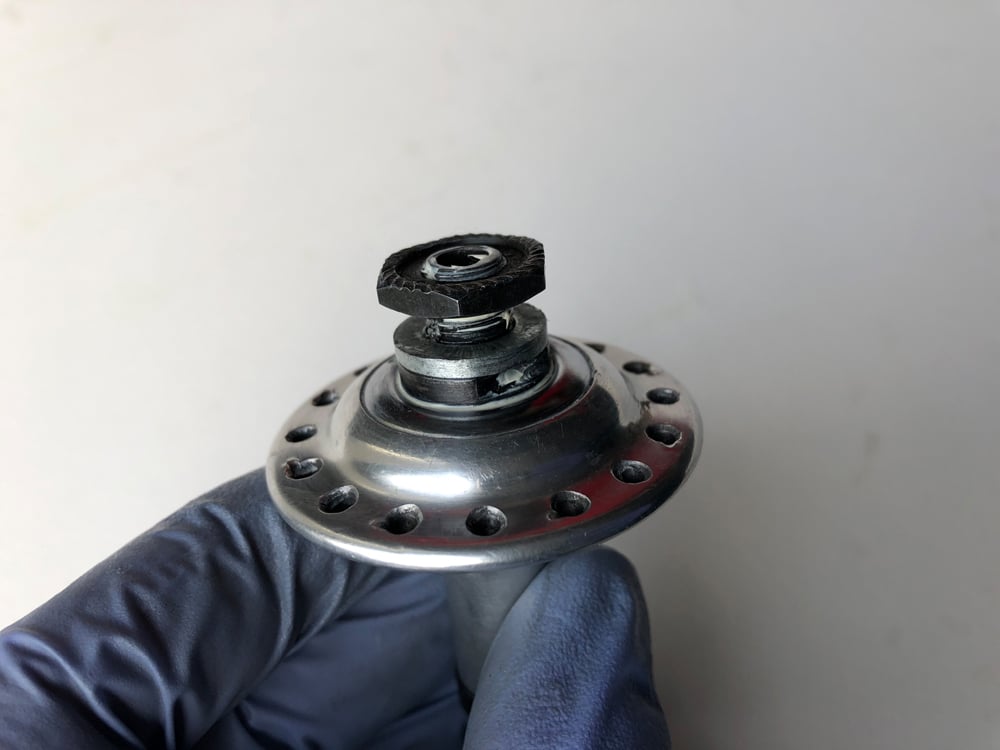
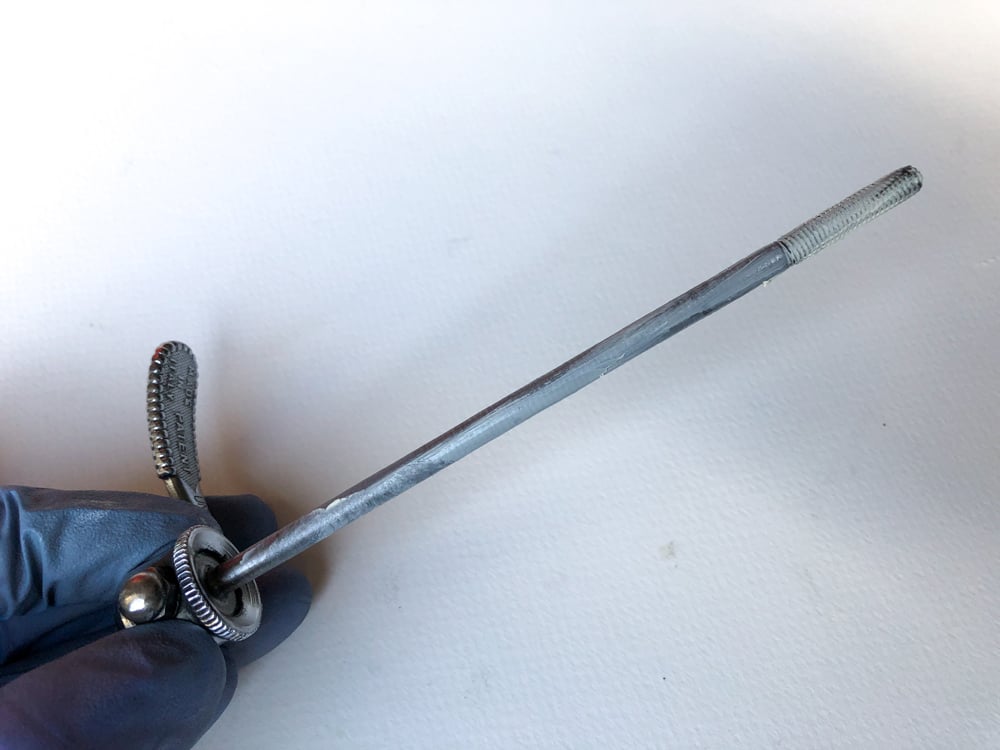
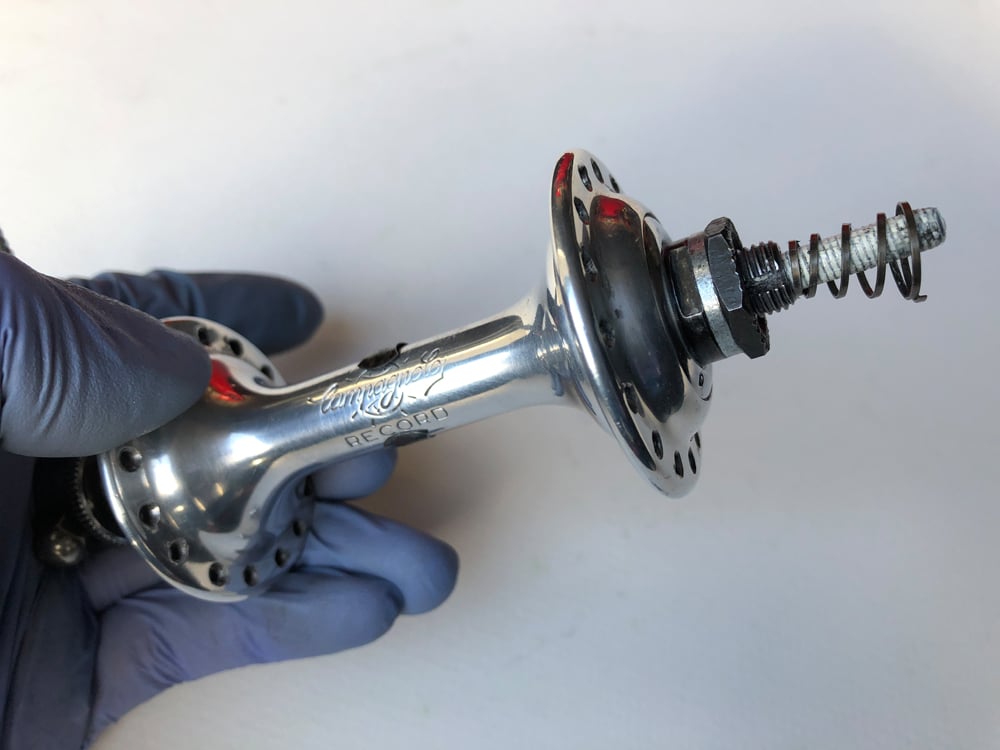
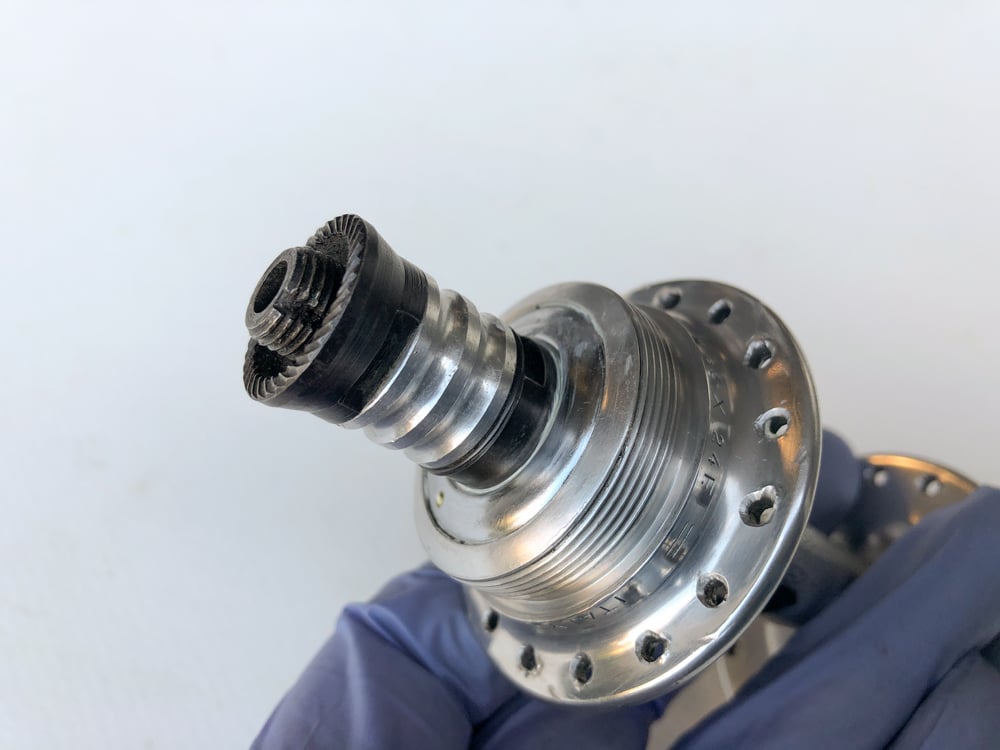
Pick any side of the hub you wish to dismantle. Slide the 13mm cone wrench onto the flat slots of the cone. Position the 16mm wrench on the lock nut. Hold the cone wrench firmly so it doesn’t move and turn the lock nut anti-clockwise to loosen it, then remove the lock nut from the axle. Next, slide the keyed washer off the axle. Note the notch in the axle thread aligns with the notch in the washer.
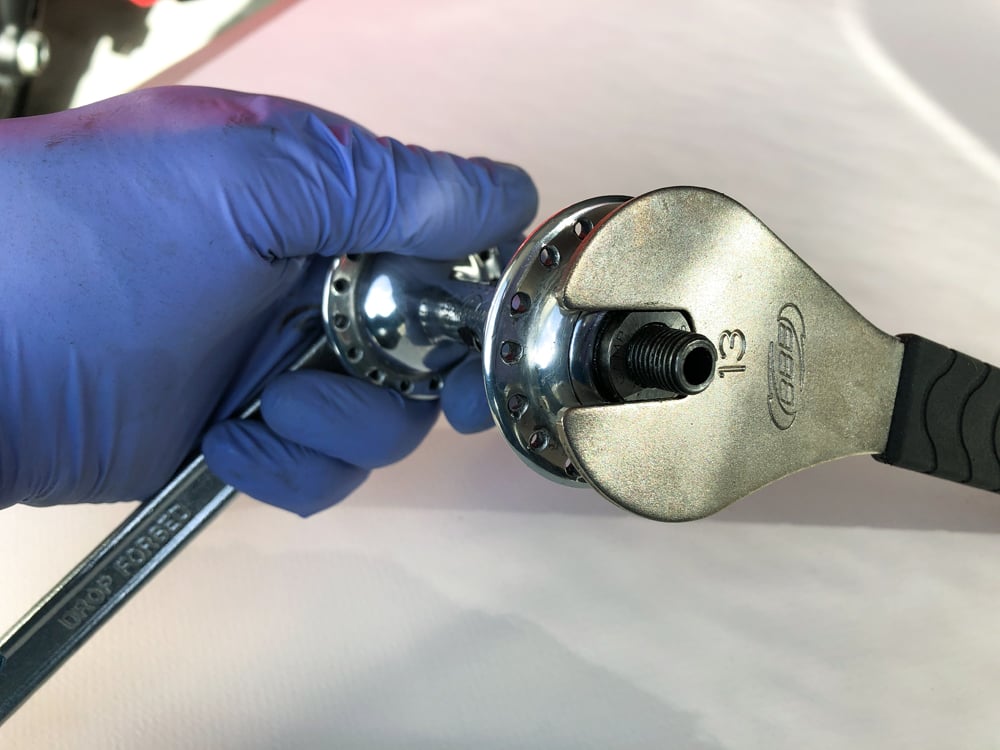
Now we need to unscrew the cone from the axle. Fit the 16mm wrench to the locknut on the opposite side of the hub and hold it firmly, then slide the cone wrench onto the flat slots of the cone and turn the cone wrench anti-clockwise to loosen the cone. Unthread the cone from the axle noting it’s orientation.
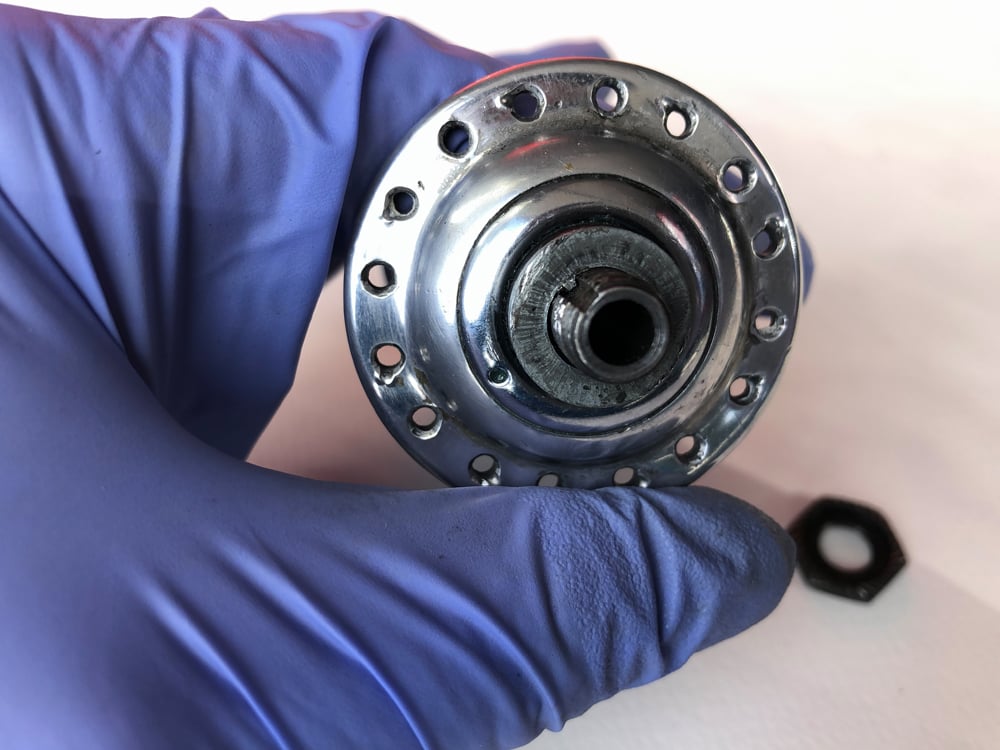
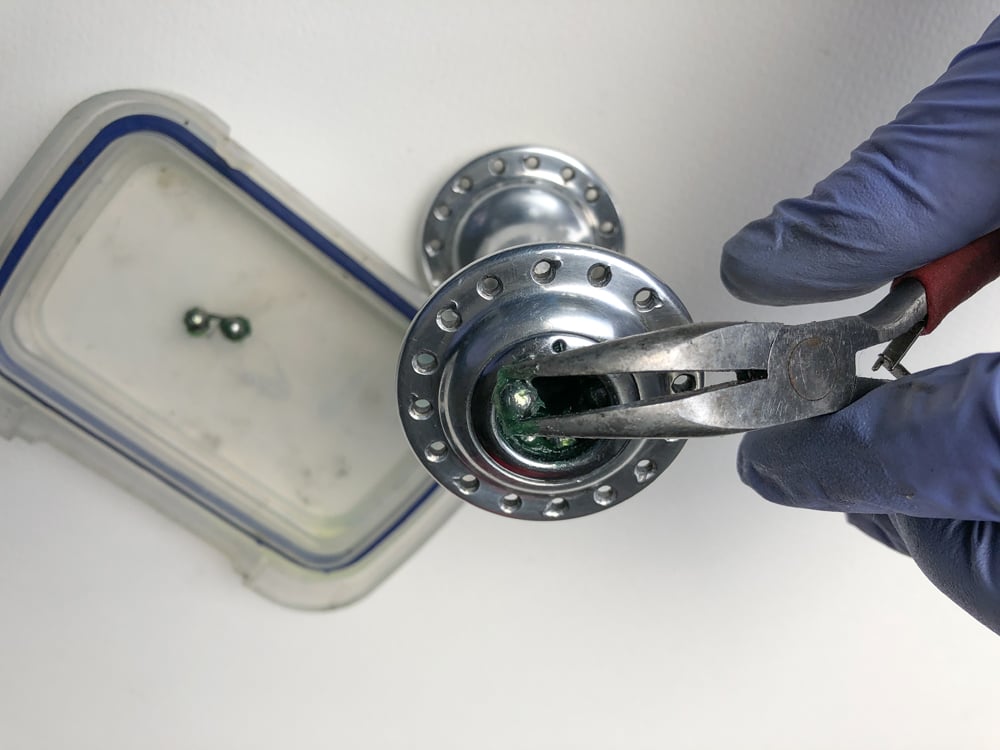
Before we pull the axle out from the hub, position the hub over a clean surface like a white paper towel just in case any of the bearings fall out when we remove the axle as you don’t want to lose any. Now pull the axle out of the hub.
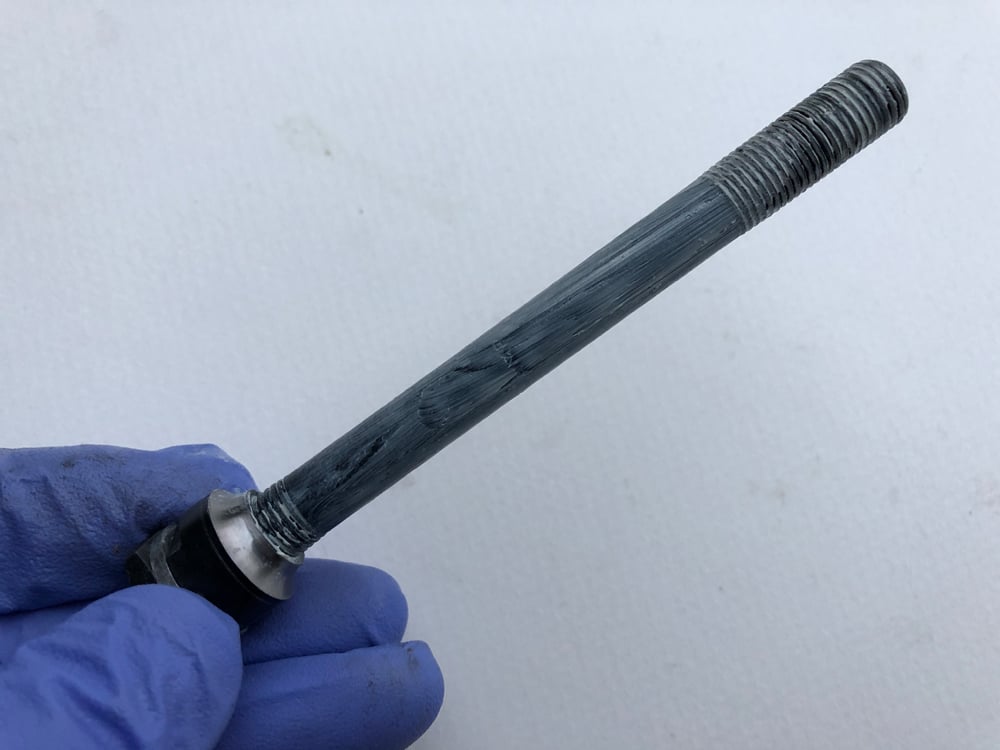
There is no need to dismantle the lock nut and cone from the other side of the axle. Keeping these parts fitted in place will ensure that when we re-assemble the hub, the axle will protrude the same distance outside of the hub as before. This protruding length of axle is important to allow a contact point for the dropouts of the front forks.
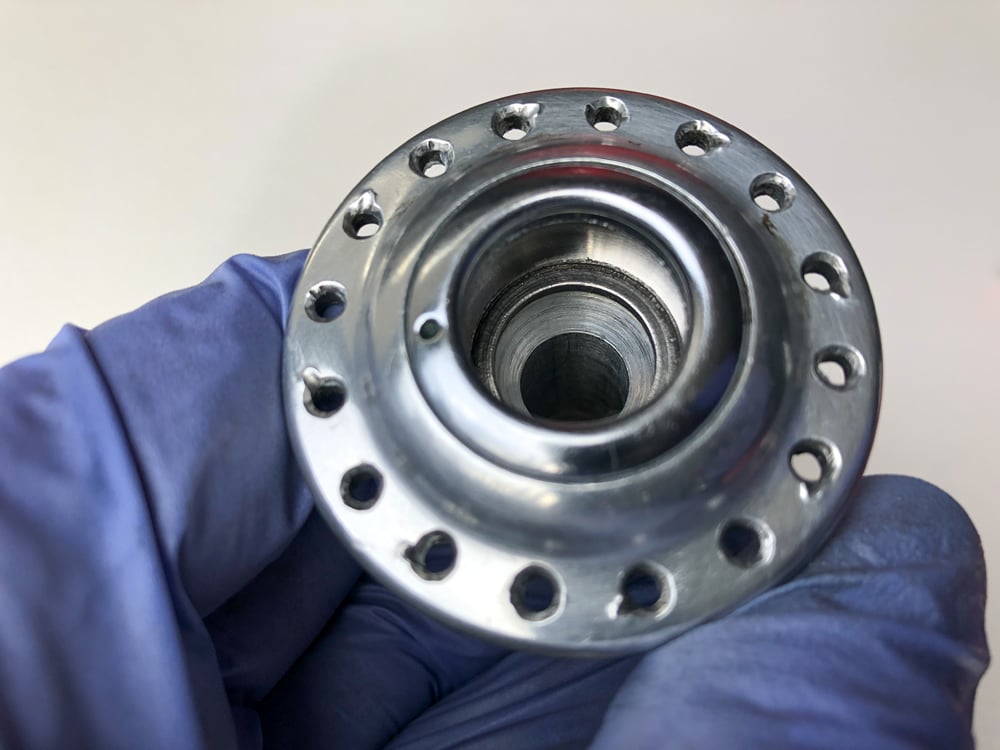
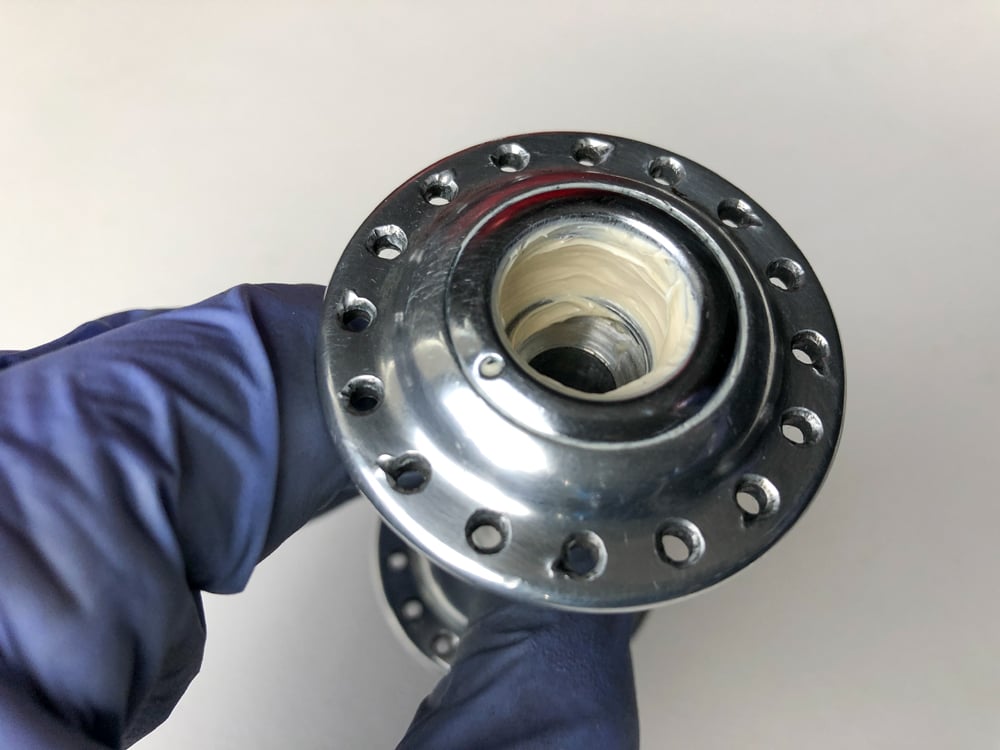
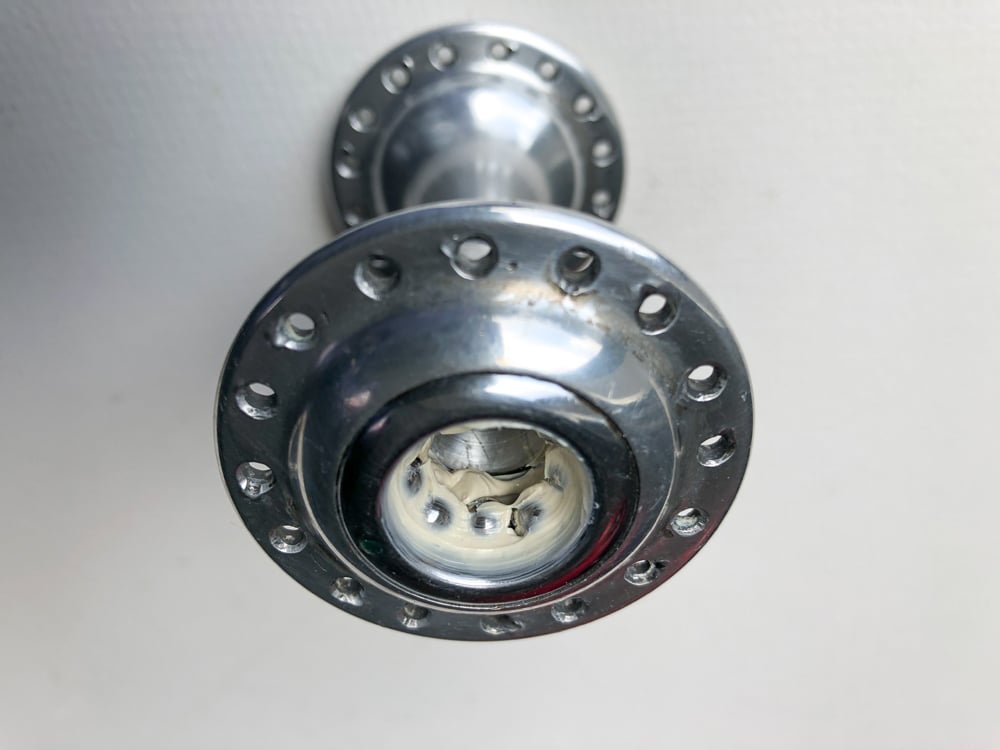
Now the axle is removed from the hub, you will see the individual ball bearings sitting in the cup. There are 9 bearings fitted to each side of my hub. The grease in this hub looks to be in good condition, but as this hub was purchased second hand, I am going to remove the grease and clean the hub to check the surface condition of the cup and bearings on both sides of the hub.
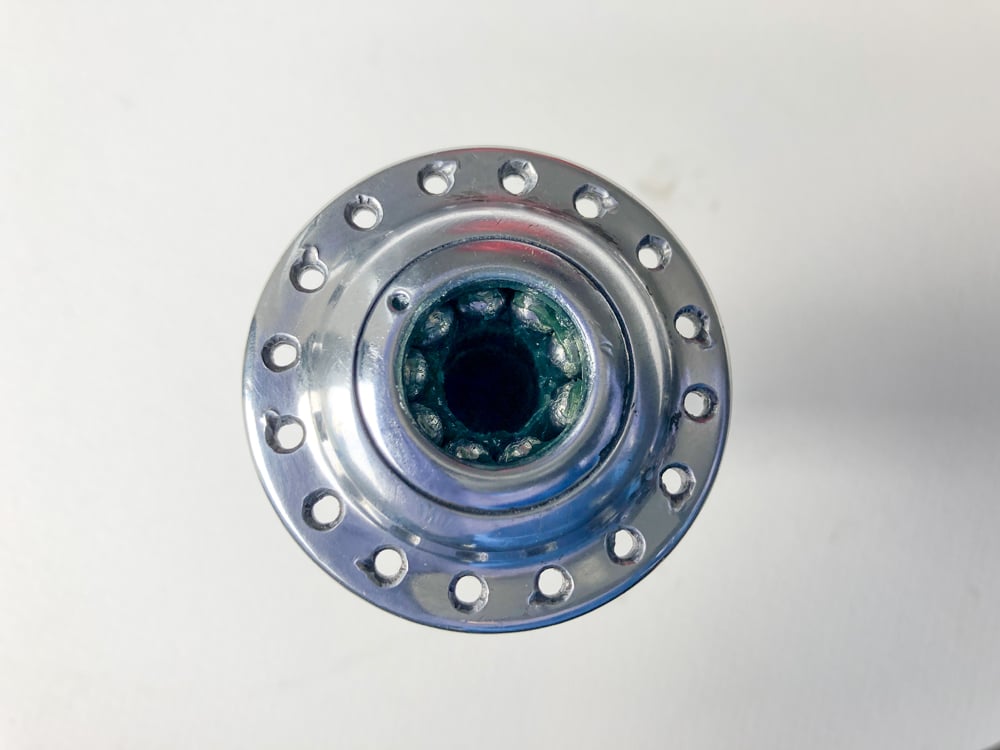
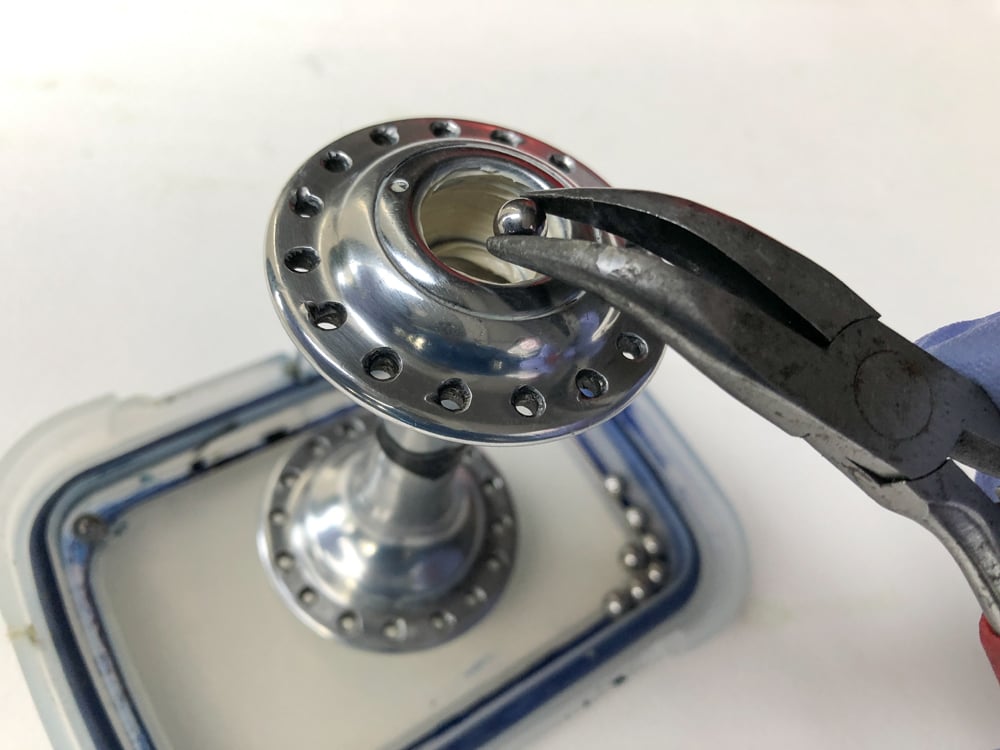
I use a pair of bent nose pliers to pluck the bearings out of the cup. Some people use magnets or other techniques for this task. Remove the bearings from both sides of the hub. If some bearings are missing, look inside the middle of the hub. Some bearings may have fallen in there. Also check if any fell out onto your paper towel.
Clean the parts
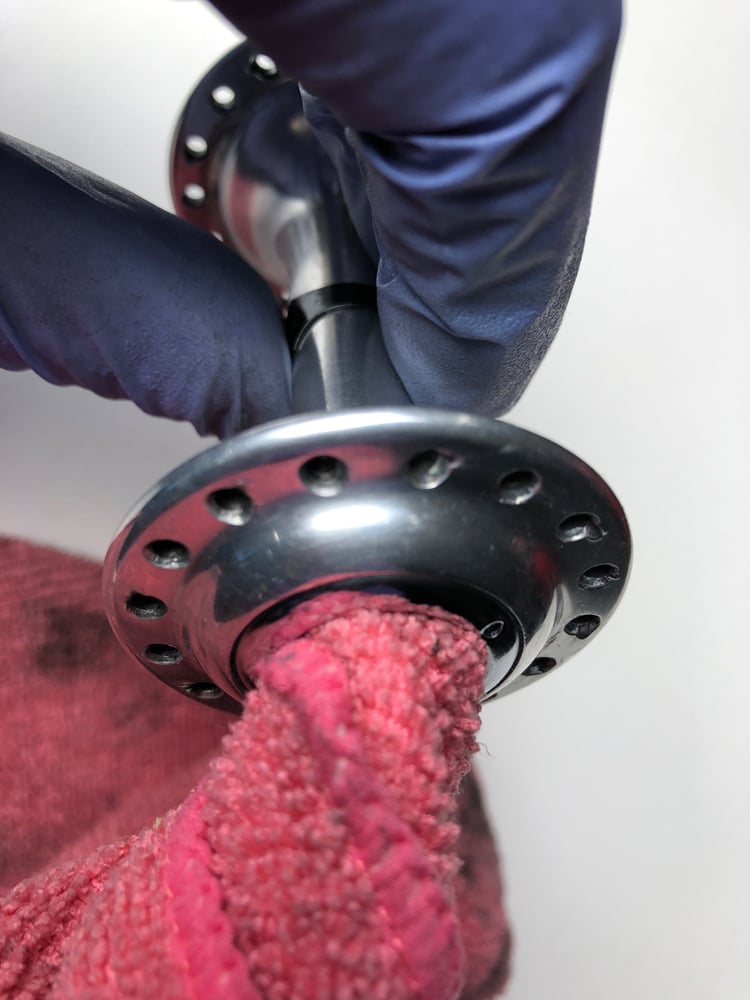
Now we are going to clean away all the old grease and muck from the inside of the hub. The more thorough you are, the better result you will get. Degreaser, rags and cotton buds are handy for this. To get a cloth all the way through the hub, I use a piece of coat hanger to gently press the rag out to the opposite side. Do not use hard tools when cleaning the inside cups as this surface must remain smooth and unscratched. Cotton tips can be handy for this task.
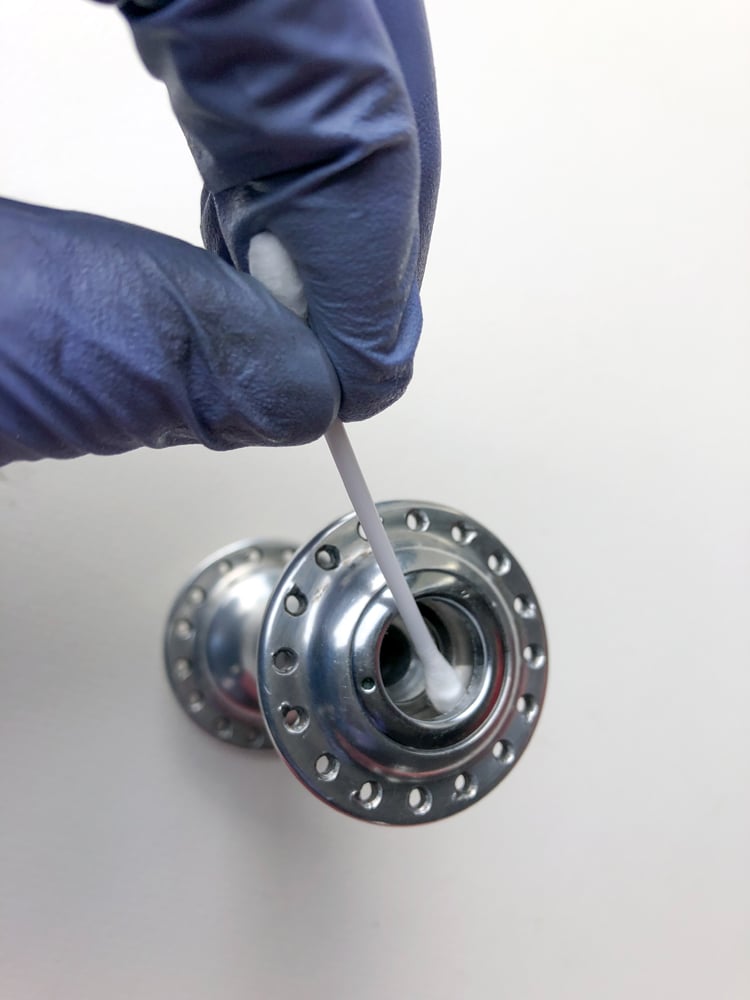
Once you have finished cleaning, make sure the inside of the hub is dry and free of any degreaser. Check the cups for any pitting or a rough surface. If the cup is damaged, you may need to replace the hub.
Now we use a bit of degreaser to clean the loose ball bearings and wipe them clean with a rag or paper towel. Inspect the bearings for any wear.
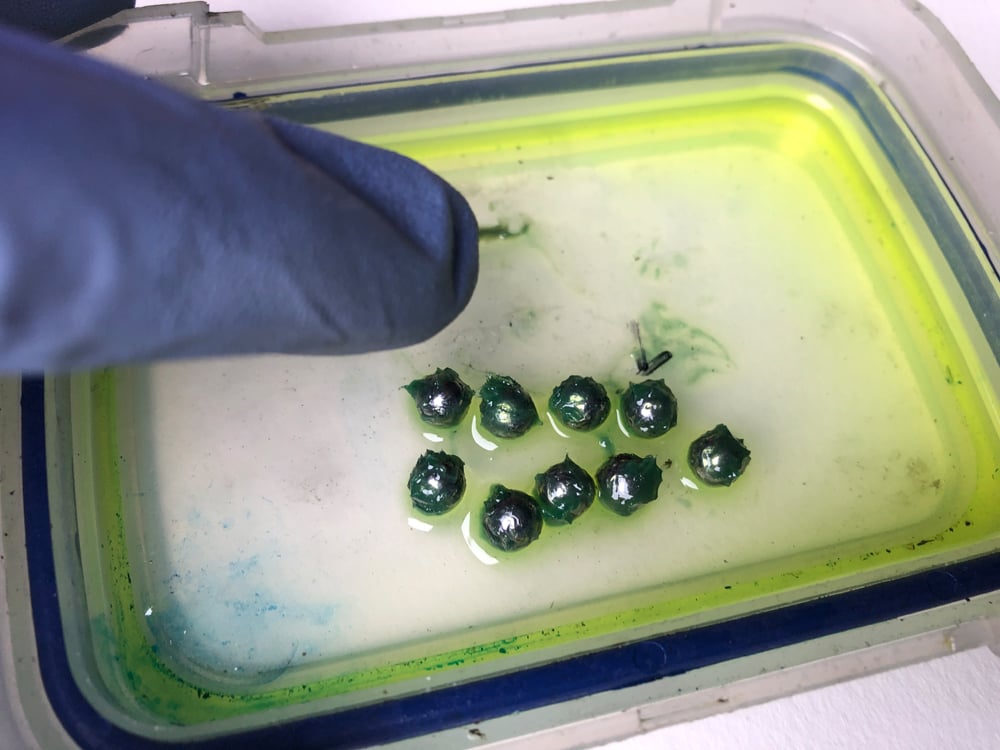
Degrease bearings 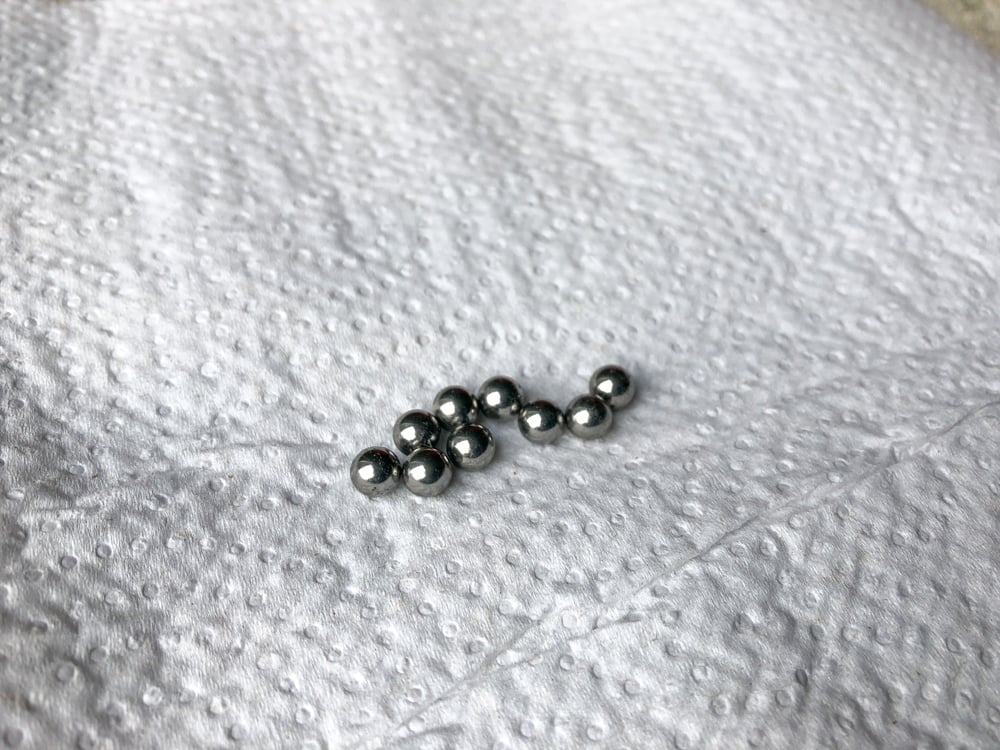
Clean bearings
Now is the opportunity to replace bearings if required. These are the measurements of the bearings from my hub.
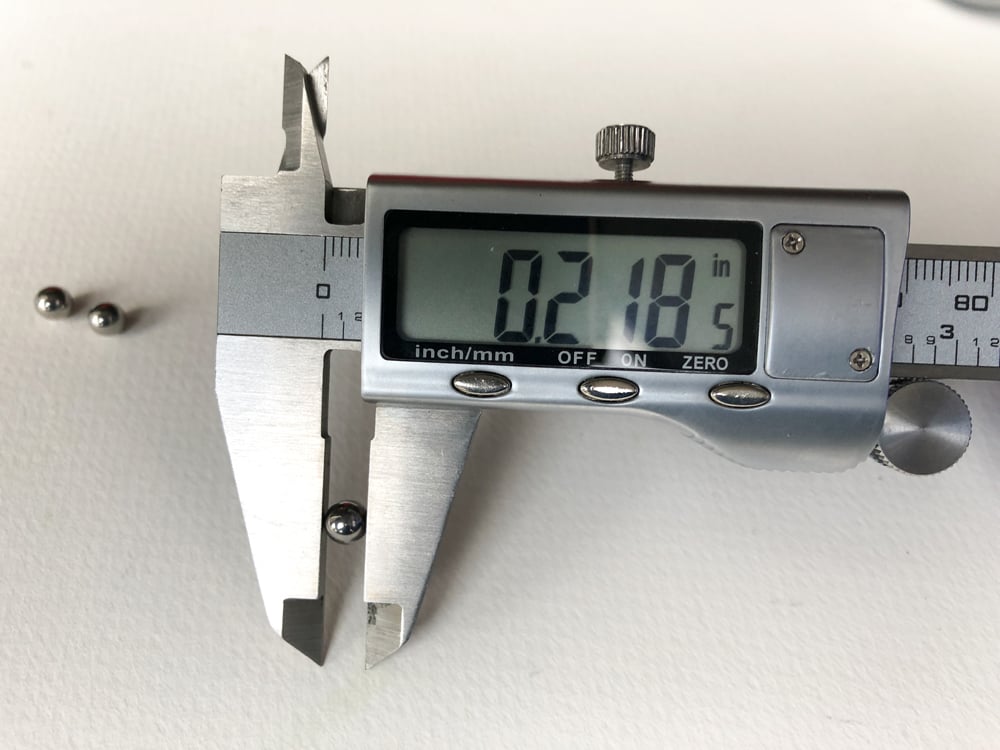
Front Hub ball bearing size: 7/32 inch 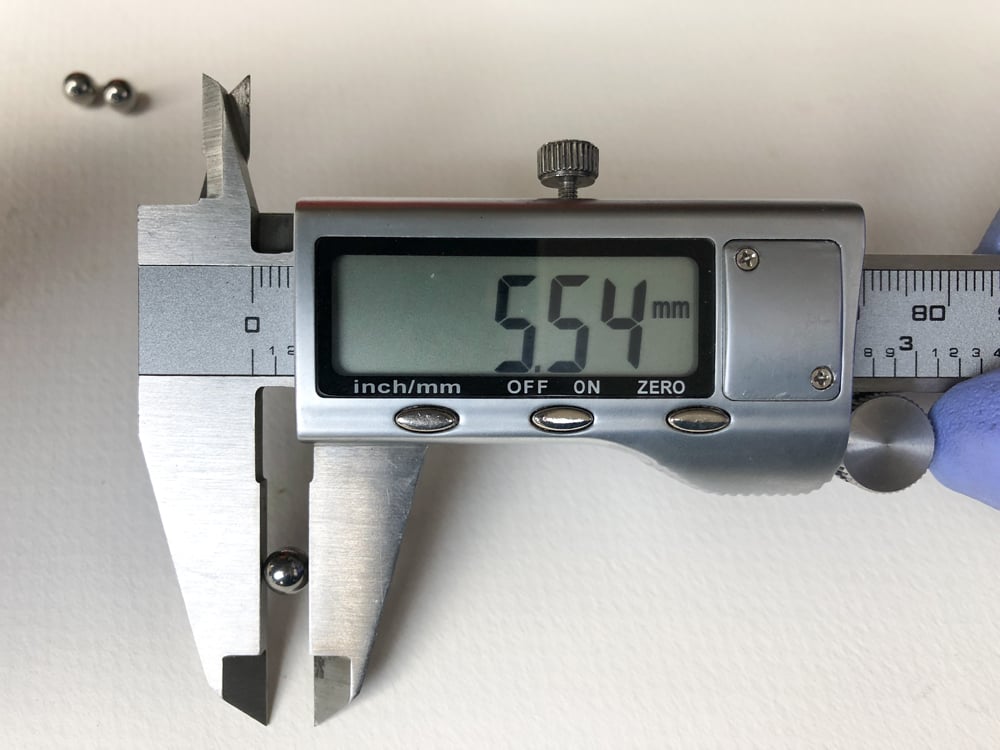
Size in metric: 5.5 mm
Clean the axle, axle threads and both cones. Check the cones for any wear.
Reassemble the Front Hub
Apply a good layer of grease to the cups on each side of the hub. Use good quality grease, don’t skimp! A small tube will last you for ages as you require so little for this job.
Note: Once the hub is reassembled, you may feel a little stickiness when rotating the axle. This is normal and will depend on the viscosity of the grease you used. In a short period of time, everything will settle-in and the axle will being to spin more freely in the hub.
Greased cup
Place the correct number of ball bearings into the cup on both sides of the hub. I count them as I insert them to make sure none went missing. The grease should easily hold them in the cup.
Apply a thin layer of grease to the axle, axle threads and both cones. This will help stop any corrosion on the axle and make it easier to re-thread the cone and lock nut.
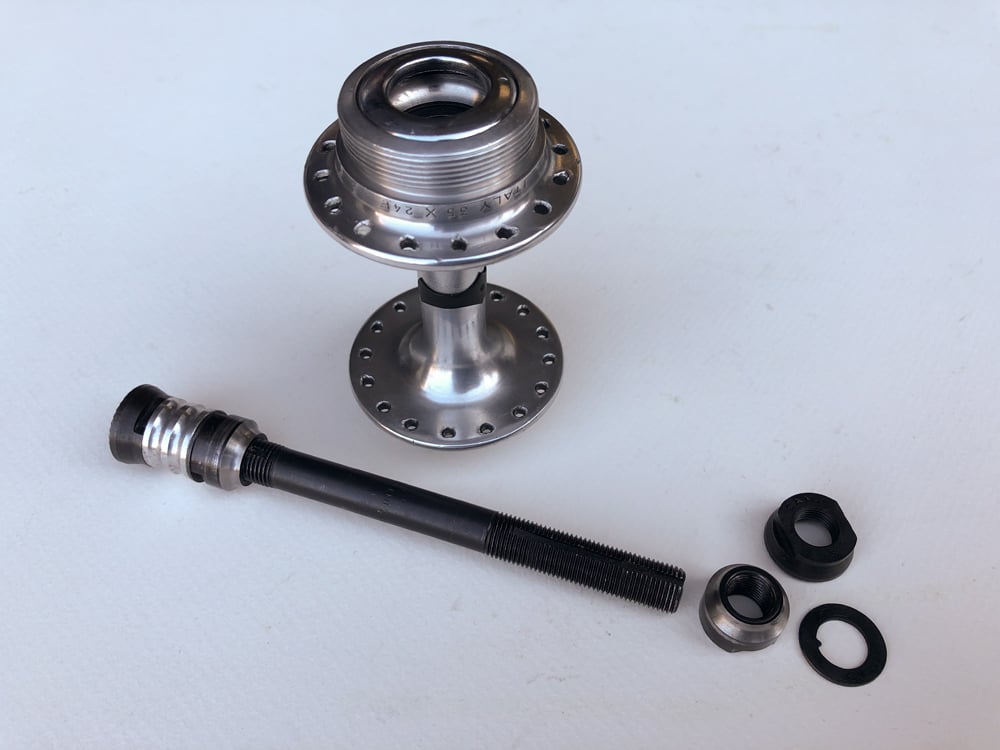
Campagnolo Record Front Hub axle
Before you insert the axle into the hub. Take a quick look to ensure all the bearings are still in place and none have fallen into the middle of the hub or out onto your paper towel. Carefully insert the axle into the hub making sure not to dislodge any bearings in the process.
Insert axle 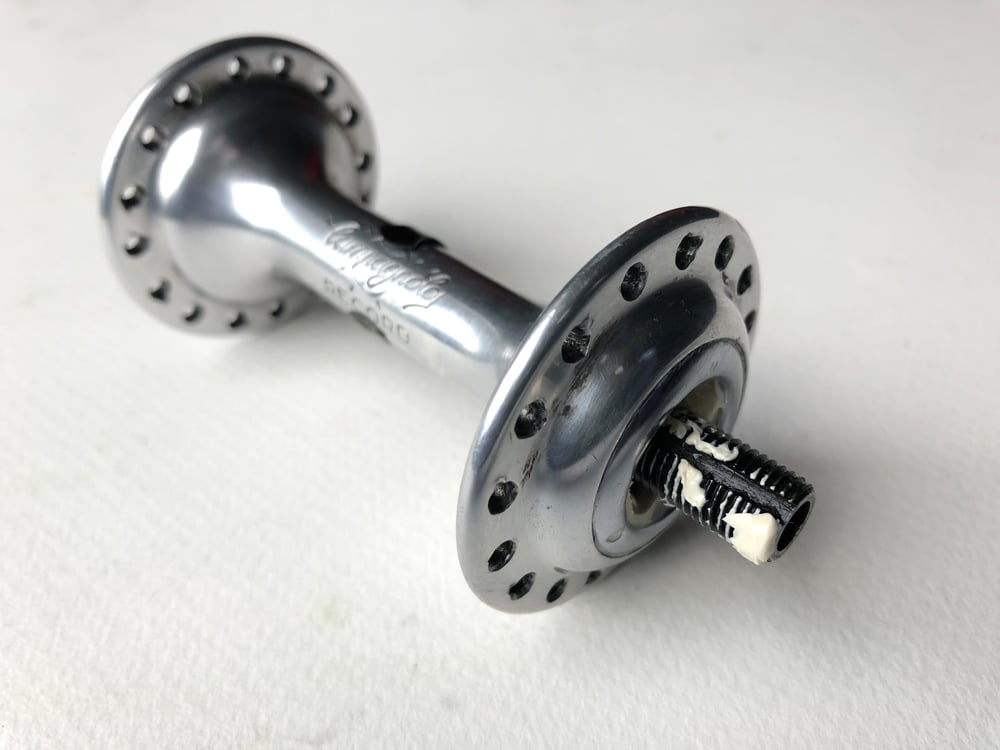
Axle fitted
Thread the cone onto the axle, making sure it is oriented as shown below.
Fit cone in correct orientation
Bearing tension adjustment
Up until this point, everything is quite straight forward. Whether this is your first time servicing a hub or your 100th time, you may need to repeat the lock nut adjustment process a few times in order to achieve the bearing tension.
Step 1. Fit the cone.
Thread the cone onto the axle and tighten it until it makes light contact with the bearings inside the hub. Now hold the cone in position on the axle for the next step.
Step 2. Check the axle for play.
Check the axle does not have any play in the hub ie. the axle should not be able to move up-and-down or in-and-out of the hub. If the axle has play, tighten the cone just a little and test again. Repeat this in small increments until there is no play in the axle.
Step 3. Check the hub rotates smoothly.
Hold the cone in position on the axle and then gently rotate the axle to see how this setting feels. Remember we want the rotation to feel smooth and light. Not tight and rough. Ultimately we want the cone to be just tight enough to eliminate axle play. We do not want the cone too tight against the bearings as this adds rolling resistance and causes premature wear of parts.
Step 4. Fit the lock nut.
Fit the lock nut onto the axle and screw it down until it just lightly touches the cone.
Step 5. Tighten the lock nut.
Fit your cone wrench to the cone and the 16mm wrench to lock nut. Tighten the lock nut just a little bit (not all the way tight), then check the axle again for smooth rotation and no play. If everything is still OK, tighten the lock nut a little bit more, otherwise, slightly adjust the cone to fix the problem. Repeat this process in small increments until the lock night is firm. There is no need to overtighten the lock nut. The QR skewer and forks will add some extra compression to the lock nut.
Congratulations.
You should now have a smooth rotating axle with no play. Don’t forget the new grease may add some resistance so the rotation, so it may not rotate as lightly as it did before the service. This will change after a few rides.
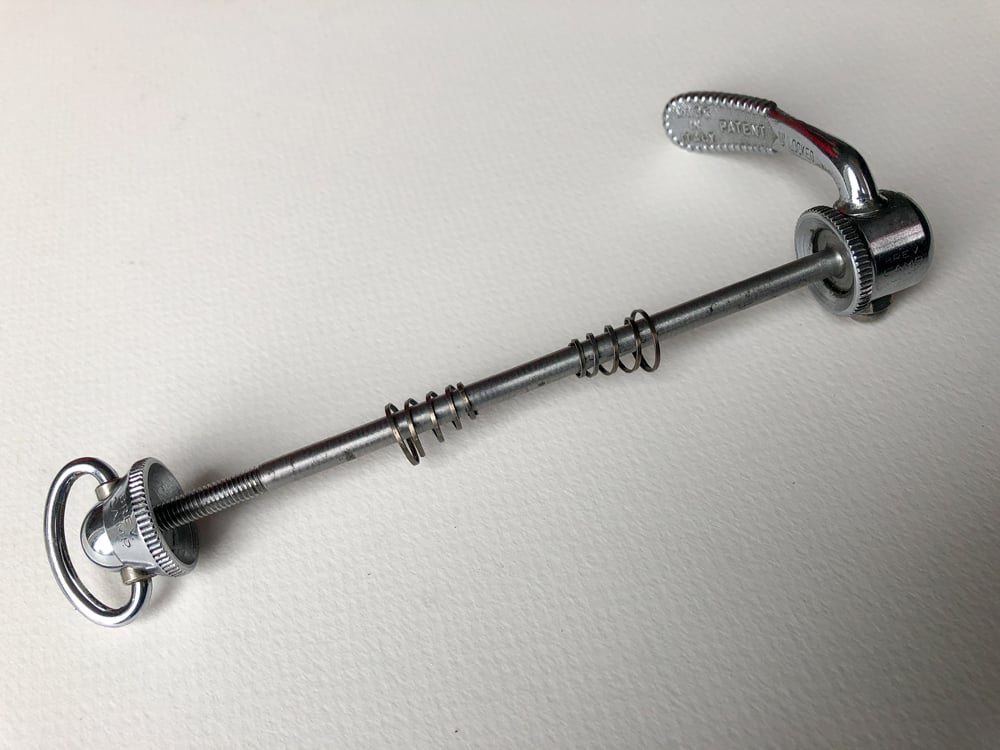
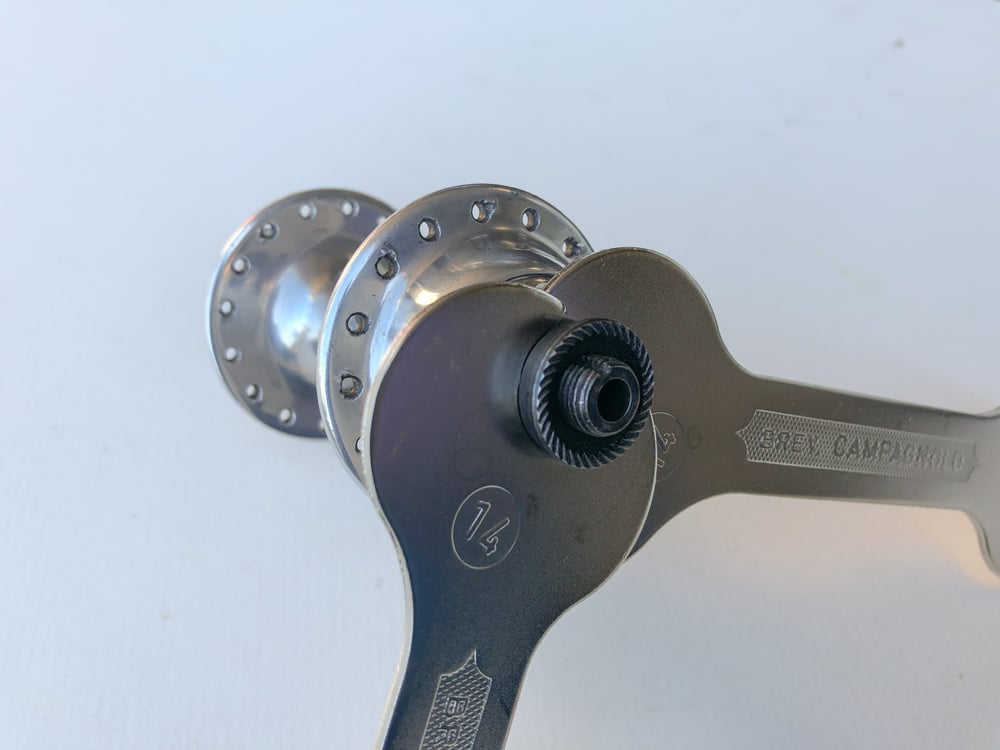
Now that the hub is finished, clean all parts of the quick release skewer. Apply a light coat of grease to the skewer and insert it into the axle. Be sure to orient the springs in the correct direction. The small end of each spring faces in toward the hub as shown. Learn how to service a Campagnolo quick release.
Allowing for quick release skewer loading
I have read a number of times over the years that you should leave the slightest amount of play in the axle when setting the bearing tension. The reason being; this extra play will be removed by the additional compression of the QR skewer and thus achieve the perfect bearing tension.
Whilst this may be the case, I don’t use this technique. I prefer to set the adjustment so there is no play in the axle, but it still rotates freely. I’d prefer the bearings fractionally too tight than risking the hub rolling on a loose axle.
Servicing the rear hub
Servicing the rear hub is nearly the identical to the front hub. The main skill is adjusting the cone to get the optimum bearing pressure. By now you should have already had lots of practice from servicing the front hub.
You will notice that the rear hub is not symmetrical like the front hub. There is an alloy spacer fitted to the axle on the drive side of the wheel. Make sure when you reassemble the hub that the axle is re-inserted in the correct orientation as shown above.
The main differences of the rear hub compared with the front hub are;
- Lock nuts are a different shape.
- We need to use 14mm cone wrenches for the cone and lock nut.
- Larger 1/4″ ball bearings (9 pcs each side).
- Spacer fitted the drive side of the axle.
- Most likely a freewheel (rear cogs) is fitted to the hub.
Remove the freewheel from the hub
You need to remove the freewheel from the hub before you service it. Each freewheel requires a specific adapter to remove it from the hub (and there are a wide variety of adapters available). If you don’t own one, do your research to get the correct one. Some common adapter styles include notched or splined adapters. Once you have the correct adapter, insert it into the centre of the freewheel, then use a wrench to turn the adapter anti-clockwise to loosen the freewheel and remove it from the hub. The freewheel may be initially hard to loosen as your pedalling forces continually tighten the freewheel (by rotating it clockwise).
MOST IMPORTANT! Do NOT use a chain whip tool. Removing a freewheel is a different process to removing a (modern) a cassette.
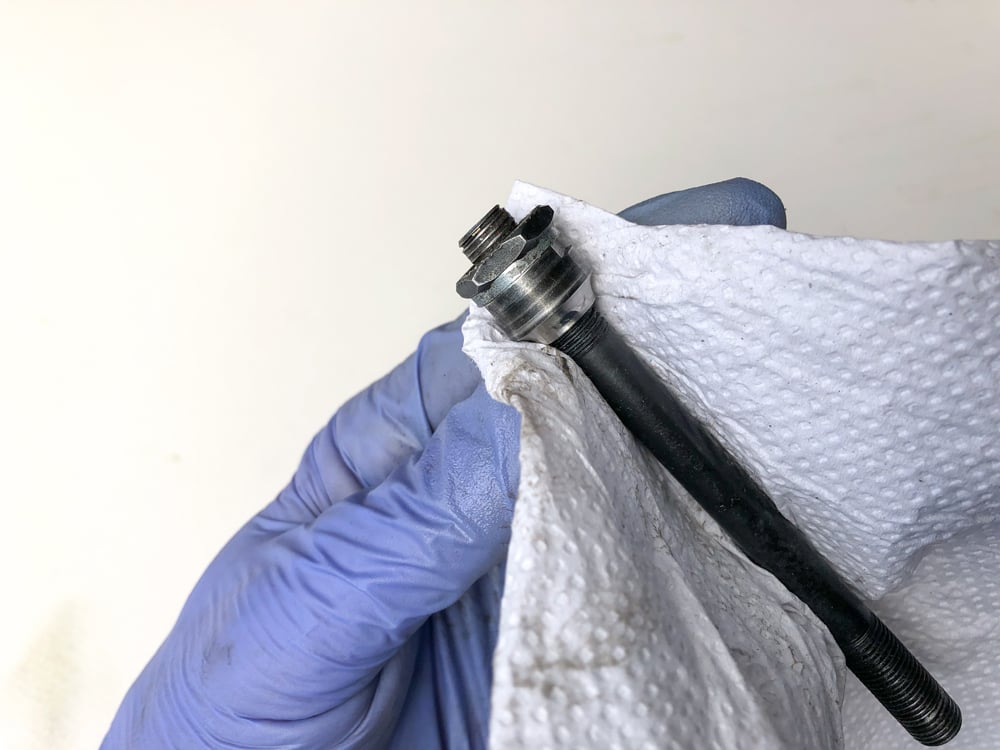
REMOVAL TIP: We can use the QR skewer to ensure the removal adapter is securely fitted into the freewheel. Start by fitting the adapter into the center of the freewheel. Now insert the quick release skewer through the hub and out through the adapter. The quick release must be just tight enough to ensure the notches of the adapter cant slip out of the freewheel body. If the quick release is too tight, it will prevent you from loosening the freewheel. Once the freewheel has loosened, remove the skewer and unthread the freewheel off the hub.
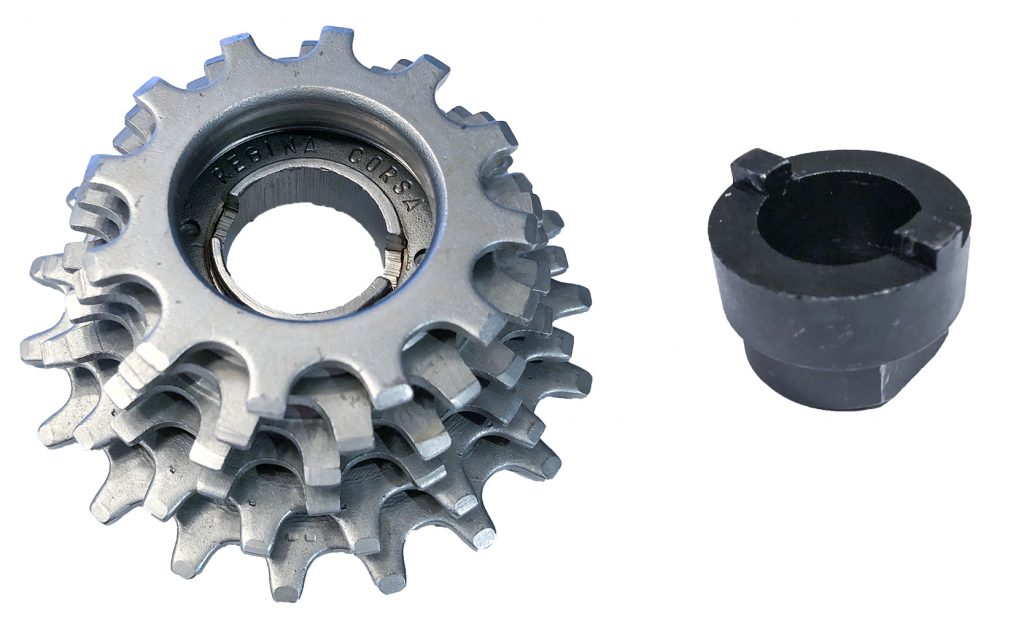
Can’t insert the freewheel removal adapter due to a small cog.
The Regina freewheel pictured features a small 12t cog. This cog must first be removed before we can fit the freewheel removal adapter. You will need 2 chain whips to remove this cog. Fit the first chain whip to the 12t cog. Fit the second chain whip to a larger cog on the freewheel. Holding both chain whips, turn the 12t cog anti-clockwise to unthread it. Now the freewheel removal adapter can be fitted. Don’t use a chain whip when removing the actual freewheel.
If you are not able to remove the freewheel, the hub can still be serviced, but it will be difficult to set the cone nut and subsequent bearing load on re-assembly. I have tried it and don’t recommend it. The problem being you cannot fit a cone wrench to the drive side cone & lock nuts (which are located inside the freehub body). I ultimately removed the freewheel in order to set the cone for correct hub bearing tension.
Disassemble the rear hub
Select a side of the axle to remove the lock nut and cone. I chose the non-drive side as there is one less part to remove (ie. spacer). Position one cone wrench onto the flats of the cone and the other cone wrench onto the flats of the lock nut. Turn the lock nut anti-clockwise to loosen it. Once the nut is loose, unthread the lock nut, slide off the keyed spacer and unthread the cone just as we did with the front hub.
Before removing the axle, place the hub over a light coloured paper towel or similar so no loose bearings are lost if they fall out of the hub. In my hub there are 9 ball bearings on each side of the hub. The bearings are the same size on both sides of the rear hub.
Campagnolo Record rear hub disassembled 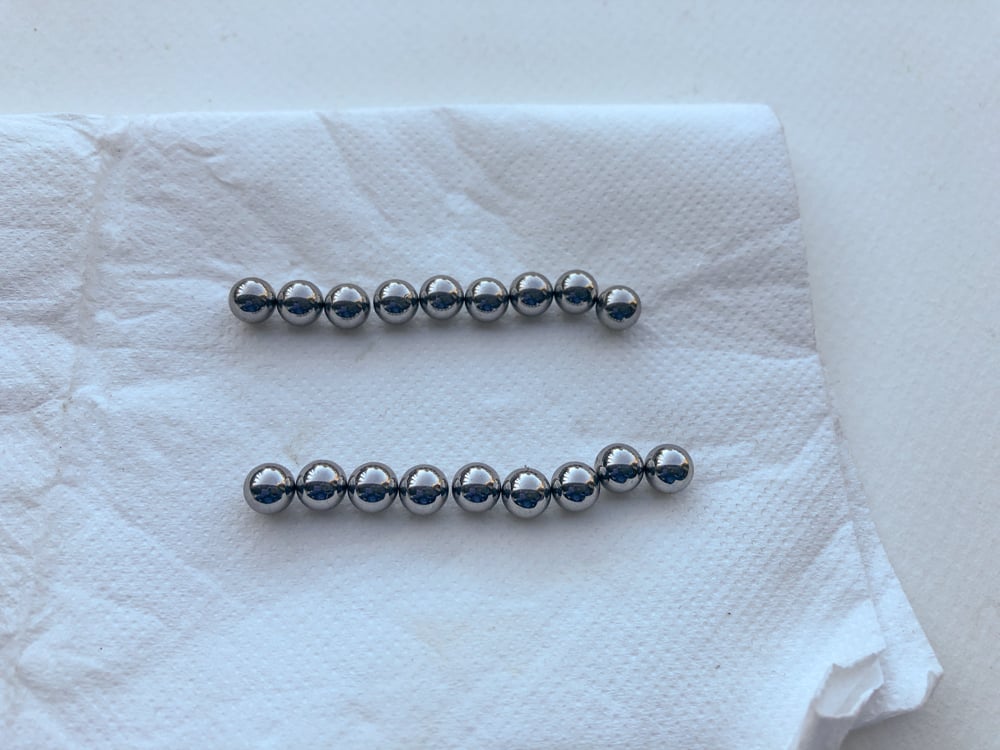
Campagnolo Record rear hub ball bearings 
Rear Hub Bearing size: 1/4 inch 
Bearing size: 6.34mm
Clean the hub and all the parts. Inspect the cups, cones and bearings for any wear. Re-grease the hub and all the parts just like the front hub. Re-insert all the bearings.
IMPORTANT! Re-insert the axle into the hub so that the axle spacer is on the drive side of the wheel. Make sure you don’t knock any bearings out of place when re-inserting the axle.
Re-assemble the remaining parts in the correct orientation on the rear axle and adjust the cone in exactly the same manner as the front hub to get the best bearing tension. Once you have completed the process. Feel the rotation of the axle for both hubs and check they feel similar. Note: the grooved side of the lock nut faces out.
Finally, apply some grease to the freewheel threads and screw the freewheel clockwise onto the hub. No need to use the adapter to tighten the freewheel onto the hub, this will happen as soon as you start pedalling the bike.
Learn How to Build or True a Wheel
I have created an article sharing the information I have learnt on how to build a wheel or to true a wheel. Once you learn how to true a wheel correctly, it is not much harder to build one from scratch.
Disclaimer!
Whilst I enjoy working on my own bikes, I am not a qualified bicycle mechanic. The content of this article is purely illustrative and does not constitute professional advice. For your own safety, this type of work should only be undertaken by a qualified bicycle mechanic. Incorrect assembly of parts could result in equipment damage, personal injury or death.
About Me.
I have been riding and working on my own bikes for many years now. I wanted to share my experiences, knowledge and research with others. My aim is to inspire people to get involved in all aspects of this amazing sport. Cheers.
Comments.
I welcome reader feedback in the comments section. Should you wish to suggest an amendment, please include a note advising the source of your information so that myself and other readers can ascertain the accuracy of your information. Note: Trolling or argumentative comments will be removed as they are counter-productive.
Can you tell me how to identify vintage Campagnolo hubs. I have a wheel I bought in the late 80’s that I rode recently and broke the axle. I’d like to replace the axle, but I have no recollection what it is. The only markings are the campagnolo insignia in the center of the hub and markings near the threads for the freewheel indicating the threading. Any ideas? Thanks in advance.
Hi David, I recommend you search eBay for Vintage Campagnolo hubs, there are heaps of them for sale from nearly every period of manufacture. Once you have identified the matching model you should be able to buy a replacement hub, dismantle it and use the axle in your wheel. If it’s the rear hub, make sure the over lock nut dimension (OLD) measurement of the replacement hub matches your hub (probably either 126mm or 130mm), otherwise the replacement axle will be the wrong length and it’s back to the drawing board.
It seems odd that Campagnolo engineers would design everything in metric dimensions, then use bearings that measure in fractions of an inch. Metric bearings certainly exist, and they are made by the same companies that make the fractional inch bearings. I don’t expect you to have an explanation for this phenomenom, It’s just an observation that is puzzling.
It’s crazier than that. The axle is 10 mm diameter but the threads are 26 tpi (threads per inch).
Hi! Thank you sir for your website as such, and this post in particular. I recently have had the good fortune to buy an old Italian steelbike from the early eighties (Daccordi Turbo), which apparently barely have been ridden. Seems like it have been stoved away for a very long time. It has a beautiful SunTour Superbe group apart from the wheelhubs, which are Campagnolo. I have picked everything apart, but until now, nothing serious have need to be done, other than cleaning and polishing, which is what have led me to the assumption, that this bike have barely been ridden.
But then I started on the wheels, and they did not spin very well. At first I assumed the hubs had been tightened too much. Since it is very long time since I last maintained these kind of bikes/wheels a friend of mine directed me to your website for guidance. And that was probably a good thing, because otherwise I am not sure I would have picked up the correct number of ball bearings. For some strange reason, some time in the past, somebody have managed to put 10 bearings into each side of the frontwheel! No wonder it did not spinn well. Once thoroughly cleaned miraculously enough the cups had not been damaged. The cones on the other side were definitely damaged, one more than the other, so those I will have to find a pair of on Ebay.
Well this turned out to be a bit longer than intended, but sharing our passion for the bike is after all a good thing. I will be back for future enlightenment!
Hi Mikael, glad to hear the article was of help to you and sounds like you have a very nice Italian steel bike to enjoy. There’s no doubt the old Campagnolo hubs are very sturdy and luckily the hub body was not damaged, so the wheel does not need to be rebuilt.
There’s heaps of 2nd hand Campagnolo hubs on eBay so it shouldn’t be difficult to find a set that can be stripped for parts. Once the hubs are fixed, I think you will find them amazingly smooth and quiet. Definitely invest some time setting the bearing tension as it is can give a really smooth spin.
Hi
Just stumbled on this site so wanted to say thank you for the information. One comment, when servicing cup and cone hubs I would always remove the non drive side cone leaving the drive side cone tight against the lock nut. The reason for this is if you do not do the lock nut up tight enough the cone will move by precession. Non drive side cone will unscrew which leaves you with a poorly adjusted hub but the drive side cone will tighten against the hub which can destroy it.
Best Wishes
Steve
Hi Steve, thanks for your sharing your experience.
I definitely recommend for everyone servicing their hubs to make sure the lock nuts are both firm to ensure there is no lateral play in the axle. If the cones and lock nuts are correctly adjusted, the quick release should compress the frame into the lock nuts making it difficult for them to come loose.
If your bike has forward facing horizontal drop-outs, the quick release on the rear wheel needs to be done-up tightly to ensure that the wheel is not pulled out of alignment when pushing hard on the pedals. Check your axle for play for the first few rides after servicing. This simple check can be done with the wheel in the bike, just try to move the wheel rim left and right with your hand. You don’t need lots of pressure to check the hub is solid. Don’t confuse a spoke movement with the hub moving, you can test the rim in several places on the wheel if you are not sure.
… may I add that I’ve found that some after-market skewers do not apply adequate pressure to keep the rear wheel aligned in (“classic”) horizontal drop-outs you mention. I thought I was saving a few grams of weight to try aluminum skewers – might be just fine for the front wheel, or for a vertical style drop-out, but I simply cannot get this particular rear skewer to do its job. I just stick with original Campy skewers and never have alignment issues.
Good article. Thank you!
Hi Denis, thanks for your comment. Great to hear the article was of help to you.
Thanks for the great article. I am part way through replacing a broken spindle in my rear campy record hub (early 80s I believe). When I was taking it apart there seemed to be the remnants of some sort of plastic spacer in line with the bearings. Possibly orange coloured. Is this something you have seen before? Hard to tell what it was as there is not much left. Looks like this is the first service the bearings have had.
Hi Dan, glad to hear the article was helpful for you. I have worked on 3 sets of Campagnolo Record hubs and have not come across an internal plastic spacer. I also didn’t see it mentioned in the original Campagnolo parts schematic. Perhaps it was some kind of bearing cage although I thought they were usually metal also?
Thanks Rouleur, that’s good to know. Since posting I did wonder if it was the remnants of coloured grease that had gone very hard. I will continue all the same.
The only thing I would add is that I would remove the dust caps, as their inner surface is concave and can harbor dirt and hardened grease. They pop out easily with a small screwdriver; be gentle and use more than one part of the circle so you don’t bend them. Once cleaned, gently tap them back into place with a rubber hammer or cover them with cloth and tap them with a hammer.
And your instructions apply to a good many different hubs, not just Campy Records (or did you already say that?).
Hello. Helpful post.
I have a campag rear hub that will not take a 5 speed block. Has someone possible rebuilt it with a short spindle and thinner spacer? By chance l have a campag spindle in the bits box that is 135mm approx. Can l perhaps just rebuild the hub with the longer spindle and thicker spacers until a 5 speed block fits? I can then centre the hub in relation to the rim whe l build the wheel?
Regards, Adam.
Hi Adam, my understanding is that a 5 speed freewheel requires a rear hub with a 120mm Over lock nut dimension (OLD). According to ads shown on ebay, the overall axle length of a 5 spd axle is about 129 mm. Assuming your axle is shorter than that, maybe the hub was built for single speed configuration?
In regards to your idea of using a 135mm axle with a 5spd freewheel, I’m sure it could all be made to work with the correct axle spacers and wheel dish, but I personally wouldn’t invest all the time into building a non-standard rear wheel just to use up a few old parts. For a small outlay, I would buy a 5 spd hub to either use ‘as is’, or strip for the parts to fix yours and finish with a conventional setup. It will also mean you dont need to change the rear spacing of the frame (to 126mm) assuming it is currently 120mm.
I always leave play in the axle on a quick release hub adjustment. To test adjustment, use the skewer tightened over spacers substituted for dropouts. Also test your adjustment without play. You will be shocked to find how much drag and grind to cause premature wear. This advice came to me in 1980 from Campagnolo service reps at a Campy certified technician seminar.
When overhauling anything with bearings, if you really want to get down to the nitty gritty, it is best to replace them no matter how they look. The cups and cones can almost always be reused with a smooth line of wear. The bearings will also have a smooth wear line as well. Not as easily detected. The point is when they are reused all the wear lines will not be in their original orientation. Did you know Campy goes through the trouble of running the new bearings through a micrometer to make matched sets. Well, in 1980 anyway they did. Don’t mix your new bearing sets left and right sides as they may not have come from the same batch negating the micrometer match. I don’t know how deep a wear line is but that is pretty much Campagnolo’s point. The bearings will be uneven.
Thank you for your website. I share your enthusiasm for the craft. Working on my own classic steel frame as well.
Hi Eric, thanks for your comments. Yes, definitely, if you want the hubs to run like new, you need to replace all the parts that wear, bearings are easy to replace, but getting hold of vintage cups/cones would be quite difficult I expect.
When talking about hub wear that is barely visible, I personally would not be able to detect the difference when pedalling, having replaced old with new parts. However, I would be more likely to notice a problem if the bearings were not adjusted correctly ie. too loose or too tight.
It is a good idea to keep the left/right bearings separated and fitted back into the correct sides of the hub during a service, but there have been times I haven’t done this and yet still able to get a smooth spinning hub, provided the parts were still in good condition. Ultimately worn hubs will have a gritty feel unless you replace these parts. Good luck with your steel frame project.
Thanks for the instructions-
I just used them to rebuild my Campy hubs. I used to work in a bike store and built my bike back in 1978. (state of the art back then!) I just recently had to pull the freewheel and clean it since it started spinning both ways (the pawls inside got stuck over time-cleaning and reoiling solved the issue). However, I noted that the hubs were “grinding” when I spun the wheel. I used your instructions to replace the rear bearings (I ordered new 1/4 inch bearings from Amazon) and now it is “like new”. Thanks for the info–spot on!!.
Hi Richard, great to hear you were able to fix your freewheel and hub!