
Welcome to part 7 of my Colnago Nuovo Mexico restoration. In the previous parts I have discussed the following parts of this restoration;
- Part 1 – Frame selection and remove paint to raw steel frame.
- Part 2 – Paint colour and decal selection process.
- Part 3 – Choosing the Campagnolo components.
- Part 4 – Wheel build, freewheel and chain selection.
- Part 5 – Choosing the finishing kit
- Part 6 – Fit Headset, Bottom Bracket, Bars, Stem, Levers & Brakes
Fit Friction Shift Levers
These Campagnolo shift levers are simple to install. There is a left and right lever so you need to ensure you have them fitted to the correct sides. Make sure the thread of the fram shift bosses is nice and clean as the D-Ring fitting on the Campagnolo bolt does not give you a lot of leverage, so if the frame threads are dirty or corroded, you may not be able to tighten the bolt to give sufficient friction.
I cleaned out these threads first using a different bolt with a screw driver head. Once this was done, the Campagnolo bolt screwed in easily allowing me to tighten it to provide the correct amount of friction.
For installation instructions, list of parts as well as a nice tip on how to add extra friction, refer to my Campagnolo friction shift levers review.
To learn the secrets of a perfect gear change using friction shift levers, refer to my Friction Shifting Tips for the Perfect Gear Change.

How to Stop a Friction Shift Lever Fixing Bolt Coming Loose.
When testing the rear derailleur, I found that moving the lever was causing the shift lever fixing bolt to keep coming loose which results in the derailleur not staying in position. So I removed the shift lever fixing bolt and cleaned the threads of the bolt and the shifter boss on the frame.
Next I applied Loctite 243 to the threads of only the LOWER half of the fixing bolt and a light grease to the UPPER threads of the fixing bolt. The reason I only applied Loctite to just the lower threads of the bolt is to ensure the bolt will not come loose, but it can still be easily removed some time in the future. The D-ring design of this fixing bolt head does not provide an opportunity to apply a lot of force to unscrew a tight bolt.
I refitted the bolt and tightened it to achieve the required resistance in the shift lever, then left it overnight for the Loctite to set. The Loctite definately holds the bolt in place, but the bond can be broken without any problems if you need to remove the bolt.
Fit the Regina Freewheel
The Regina freewheel I purchased for this build was in excellent condition, but I decided to dismantle the freewheel for a full service so I could inspect all the parts, then clean, grease and re-assemble.
Once the service was completed, I greased the threads of the Campagnolo Super Record rear hub and simply threaded the freewheel onto the hub in a clockwise direction. The Italian threading of this freewheel matches the Italian threading of the rear hub. I didn’t bother tightening the freewheel because once you start pedaling, the force of the chain will pull it tight immediately. Freewheels are easy to put on but can be difficult to remove.
The photos below show these steps. I have also included a photo of the tool required to remove the freewheel if ever required. This splined adapter is required only if you want to remove the freewheel. Unlike modern freehubs & cassettes, do not use a chain whip when removing a freewheel.

Campagnolo Record Rear Hub 
Regina Freewheel fitted to rear hub 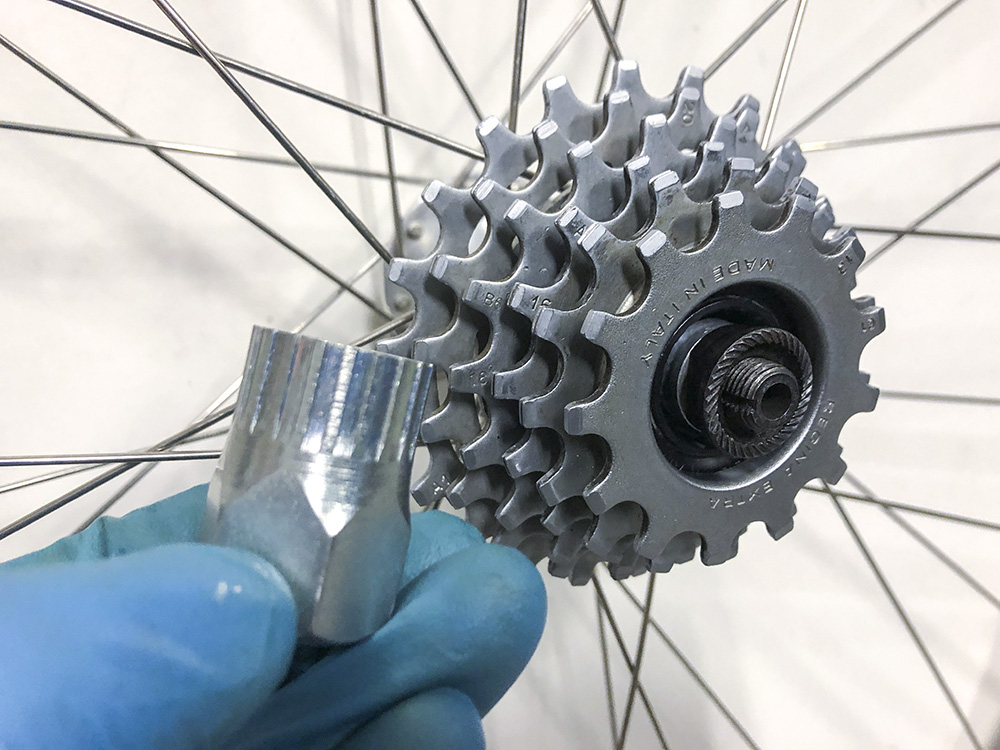
Removal Tool for Regina Freewheel
Fit Campagnolo Super Record Crankset
In my opinion, the crankset is one of the most beautiful pieces of the vintage Campagnolo Super Record group and is easy to install when you have the correct socket tool. This socket needs to not be too thick so as to fit inside the crankset hole when tightening the bolt. My crankset extractor tool (which is used to remove the cranks from a square taper bottom bracket) included a socket that does the job of installing and removing crank bolts very well.

I always apply grease the flats of the bottom bracket axle before fitting the cranks as it makes it easy to tighten and (later) remove the crank. The grease will also help to eliminate any creaking when pedaling. I also grease the threads of the drive side crank bolt and both the decorative Campagnolo crankset caps. I now use Loctite on the non-drive side crank bolt (instead of grease) as I found it can come loose after a period of riding as shown below. I tightened the crank bolts to a firm pressure of 22 Nm, but according to Park Tools you can tighten them higher if you wish.

Fitting the Derailleurs
Rear Derailleur
Fitting the rear derailleur is a simple process that requires just one bolt to be tightened to the rear drop-out. Just make sure that the rear tab of the derailleur sits above the hook on the rear drop-out so when you rotate the derailleur toward the front of the bike this tab will engage with the hook on the rear drop-out and stop the derailleur rotating any further forward. Due to the design of the derailleur fixing bolt the rear derailleur should easily rotate forward and backward even when it is tightened.

I used a 20cm length of traditional stainless steel coil shift housing with 2 step-down ferrules, but you can also use modern Campagnolo shift cable housing if you want.
Front Derailleur
More time and precision is required to fit the front derailleur. Like modern derailleurs, ensure the outside edge of the front derailleur cage sits only a few millimeters above the teeth of the large chain ring. You will need to manually push the derailleur outward to check this adjustment. Also, fully rotate the crankset to ensure the lower edge of derailleur cage doesn’t touch any teeth of the large chain ring as some may protrude higher than others.
The second step is to ensure the front derailleur cage is aligned with the chain ring. I visually determined this adjustment looking down from above the derailleur cage at the inside edge of the cage to ensure it was aligned with the chain rings. If it is not aligned, there may be some chain rub in certain gear combinations. Also shifting won’t be as good as the derailleur cage wont contact the chain evenly. Once the chain and cables are fitted, this alignment can be further fine tuned if required.
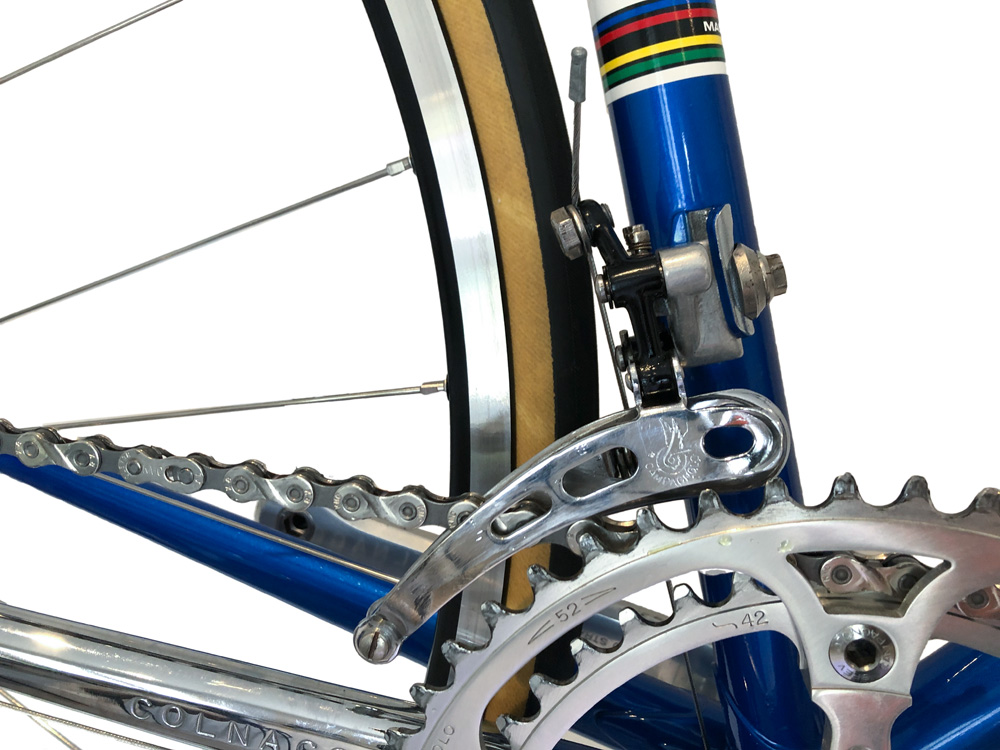
The most tricky part of installing the front derailleur is setting the outer limit screw as you will need to ensure the front derailleur can travel out as far as it can (to avoid the chain rubbing when in the big chain ring and smallest rear cog), but at the same time you don’t want the outer face of the front derailleur rubbing against the inside of the crank arm.
In my opinion this was a bit of a design issue with the Super Record cranks in that there should have been a bit more inside clearance provided for the front derailleur. You will see heaps of Campagnolo Super Record cranks on eBay with scratch marks on the inside of the drive side crank arm caused by a poorly set-up front derailleur.
Installing the Shift Cables
Unlike modern frames with internal shift cable rating, vintage frames like this one are much easier to install the shift cables. I have used modern Campagnolo shift cables on this frame. Thankfully Campagnolo have used the same (or very similar) cable ferrule design since the 1980’s so the cable ferrules fit perfectly in the vintage Super Record shift levers. The cables travel along the outside of the down tube and over the bottom bracket, routed through the 4 cable guides visible in the image below and then onto the front and rear derailleurs.

Unfortunately, these old frames were not fitted with modern nylon cable guides on the underside of the bottom bracket (BB) as I’m guessing they weren’t invented yet. This means the cable would traditionally cut into the paint and steel on the underside of the bottom bracket. To avoid that, I have fitted 3mm clear vinyl tubes in between the frame mounted cable guides. The 3mm tubing is wide enough to ensure it will remain in place. I initially tried fitting modern plastic inner cable tubing (which looks much better), but when you shift, the cable pulls the tubing along with it, so you end up with the same situation of cable rubbing on the BB. I then applied a light oil inside the clear tubing to allow the cable to slide smoothly within.
No doubt there are other options, but if you want to install cables the traditional way, then make sure to put some grease on the cable where it contacts the BB to allow it to slide. This area should then be cleaned regularly and re-greased to avoid a build-up of sand and grit under the cables rubbing on the frame.
Fit KMC X8.93 – 6/7/8 Speed Chain
You probably noticed the chain already fitted in the above photos, but I thought I would add a few comments about this step. I am using a modern chain as this is a high wear component if the bike is ridden regularly. If I was not riding this bike, I would fit a vintage chain. This bike has a 6 speed freewheel so this chain is perfect and very affordable.
Before fitting this chain I soaked it in Mineral Turpentine to remove all the factory lubricant. Then I dipped it into a bath of Methylated Spirits and let it dry. Now the chain is completely stripped of all lubricants and is nice and clean to handle whilst fitting.

This chain was too long out of the pack and needed to be cut (as usual) and there are many different ways you can measure the correct length of the chain based on the gearing you have fitted. The way I do it is to fit the chain on the largest chain ring and the smallest cog. Next I pull the chain tight until the lower jockey wheel of the rear derailleur is sitting directly under the quick release skewer of the rear wheel. I then secure the chain at this length using a small zip tie. As this chain is supplied with a quick link, I make sure I zip tie the chain allowing for the quick link (as if the quick link were holding the chain together). At this point you will have the extra links dangling from the chain as it has not been cut yet.
The next step is to place the chain on all 4 extreme combinations to check that the rear derailleur is not over-extended or touching the cogs of the freewheel. Those combinations are;
- Large chain ring with small rear cog.
- Large chain ring with large rear cog.
- Small chain ring with small rear cog.
- Small chain ring with large rear cog.
Everything was perfect, so I cut the chain at the correct point and fitted the quick link which was very easy. The final step is to apply a lubricant to EVERY roller on the chain. I prefer to use a dry lubricant as this doesn’t splatter all over the rear wheel and chain stays. I find it perfect for dry riding and reduced cleaning. You will need to reapply every 150 kms or so. You will know when relubrication is required as the drive train gets noisy.
Fit Some Pedals
Purists please look away, I have NOT fitted a nice set of vintage Super Record pedals with toe-clips and straps. Instead I have fitted a set of modern Shimano (R7000) 105 modern clipless pedals. Whilst I have a set of vintage pedals, I just can’t live without clipless pedals.

So the interesting thing is pedal threads have remained the same since the 1980’s at 9/16″ 20 tpi. However, the thread on the drive side crank of this particular Campagnolo Super Record crankset was tight even though it looked to be in good condition.
My other set of vintage Campagnolo Super Record cranks threaded modern pedals without any effort so I knew they should fit OK. Also the thread on the left crank of this crankset also worked fine. So I tried a different Shimano pedal but it was the same situation. Next I decided to try fitting a vintage Campagnolo Super Record pedal and it went perfectly without any issue at all which had me surprised! At this point I would have run a tap through the crank to clean and reset the threads, but unfortunately I didn’t have this tool.
So I did it the old fashioned way which is to apply lots of grease to the threads and screw the pedal in for a few turns of resistance. Loosen it a few turns and repeat loosening and tightening in this section until the resistance dropped at which point I went in a little further and repeated the same steps. Several times during this process I completely removed the pedal and cleaned all the threads, then regreased and continued the process gradually going deeper until I was able to thread the pedal in fully with minimal resistance. Problem solved.
Article Continues on the Next Page
I hope you have enjoyed reading this article so far. On the next page you can read about the first test ride of this bike and wrapping the bar tape to complete the build.
Disclaimer
Please remember that this information is only to be used as a guide.
I consider myself an enthusiast, not an expert. Whilst I enjoy working on my own bikes, I am not a qualified bicycle mechanic. The content of this article is purely illustrative and does not constitute professional advice. For your own safety, this type of work should only be undertaken by a qualified bicycle mechanic. Incorrect assembly of parts could result in equipment damage, personal injury or death.
About Me.
I have been riding and working on my own bikes for many years now. I wanted to share my experiences, knowledge and research with others. My aim is to inspire people to get involved in all aspects of this amazing sport. Cheers.
Comments.
I welcome reader feedback in the comments section. Should you wish to suggest an amendment, please include a note advising the source of your information so that myself and other readers can ascertain the accuracy of your information. Note: Trolling or argumentative comments will be removed as they are counter-productive.
I wish to suggest an amendment to crank arm installation technique as taught to me in 1980 by Campagnolo service representatives at a training seminar.
Do not grease crank axle flats. Lack of friction can cause crank arm hole to enlarge. Further tightening may then be necessary to the point the end of the flat is reached. Then it can no longer be tightened.
Hi Eric, thanks for your comments, that’s very interesting. I personally tend to lubricate any metal on metal parts to stop potential creaks and make it easy to remove parts at some time in the future. I would expect the main cause of the crank hole enlargment would be if the crank arm fixing bolt comes loose, which can happen, so I think the most important thing is to check that bolt is at correct tension at regular intervals, or possibly use some Loctite on it.
Greetings:
Great article, thanks very much. A great reference if I decide to restore mine to original equipment. Thanks for doing all the research.
I love my Nuovo Messico. I was looking for a Master and purchased the frame from a man in Belgium and haven’t seen another on Ebay since. The paint and chrome were nearly perfect. The decals are a bit worn but it adds character. It is the best steel frame I have ever ridden. Top keep things lighter, I built mine with a 2003-05 Campy Record carbon 10 speed grouppo, 3t carbon stem, bars and seat post, and Mavic SSL rims. I ride it weekly. It’s really special since I reside in New Mexico.
Keep up the great work and research.
Cheers,
David
Enjoy the bikes. Thanks David
I was taught to run my fingers over all four sides of the square taper axle before putting on the crank arm. The natural grease was all you needed.
Hi, yes different mechanics have different approaches to assembly, some use no grease, I prefer some grease.